Universal Children’s Book Apps Made Easy
Story Tellers iOS Starter Kit 2 Documentation
Introduction…
Justin Dike here, founder of CartoonSmart.com and longtime iOS developer. I’ve made quite a few iOS Starter Kits in the past, including the original Story Tellers Kit which was programmed in Cocos2d. I’m very familiar with the work involved in creating an app, and also satisfying other developer’s needs in making their own. Over the years I’ve kept notes on feature requests (even outlandish ones) from the original Story Tellers Kit, and I’ve worked hands-on with many buyers to make their finished apps exactly how they wanted them.
I’ve known for a long time that making a second Story Tellers Kit would be inevitable, but frankly the tools just weren’t perfect. When Apple released SpriteKit, a 2D gaming framework, and essentially their own version of Cocos2d, I thought “well, maybe now.” But Xcode still didn’t have a great way to build and layout pages (scenes) within the program. When Xcode 6 came out I saw some real promise with what was possible using the new SpriteKit Scene editing options, but there were some key things that help me back (namely custom subclassing if you’re curious). So when I saw the WWDC videos on Xcode 7, I was floored. Finally Xcode looked ready for what I had in mind. I felt I could build on what they did, keep the development experience contained within Xcode, and make something that you guys (the developers) would want to create with over and over gain.
So then I used Xcode 7 and was even more impressed. Apple’s developers have really done something “next level” with it, and some of the best features of this kit are due to that. I can’t take all the credit in other words.
If you’re familiar with our past Story Tellers Kit, you’ll appreciate reading some of these new features…
- Layout and animate images within Xcode. No more figuring out where things go by plugging in x and y coordinates into the property list. Click here to watch the initial setup video for the kit.
- Your Pages can use two completely different Scenes, one for the iPad and one for the iPhone, but the properties that define the content can be shared. Click here to watch the initial setup video for the kit.
- Your images can be physics based. Readers could throw a ball against a wall and have it bounce around. And you can trigger events to occur when certain images collide with another. Click here to watch a video on physics in the kit.
- We have a camera! Your page can even set a different camera for the iPhone or iPad (and share the same Scene file). The camera can track a specific object and you can even make images or labels stick to the camera (great for interface elements or inventory slots).
- Text-to-Speech features, including voice properties (dialect / accent, pitch, rate, etc) and text support for unlimited languages. Click here to watch a video on this feature.
- Parallax movements. We know everyone loves a slick parallax effect, so not to worry, the kit makes those incredibly easy.
- Pan and move objects or menus with a simple movement gesture on the x or y axis. Click here to watch a video on this feature.
- You can layout labels for text that changes over time. You could even have the user open the iOS keyboard, fill in part of the story themselves, and that text will stay there every time they open the app. A parent could write a child’s name into the story and even include some of their favorite things to read about. Click here to find out more about this feature.
- Find and collect things. Readers search for items in pages, collect them by moving them (or an icon representing them) to an inventory slot. You can even make readers have to collect things to proceed to the next page or before something else is possible. Click here to watch a video of this feature.
- Tuck video into your scene. You can add video files within your page, and adjust the position, size, rotation and z-depth so it’s integrated perfectly. Video can be embedded in your app, stream from a URL, or hosted by Apple using On-Demand Resources. Click here to watch a video about this feature.
- Readers can set preferences for the textures of images and animation. So a girl reading the story might choose the hero character to be a courageous princess, and a boy reading it might choose a pirate. Click here to watch a video on this feature.
- Readers can be part of the story, by adding pictures from the Photo Library or by taking new photos and masking them inside images within the story. This is a huge feature for dress up type game apps, or any kid’s app really. Children love to see themselves “magically” inside their app. Click here to watch a video on this feature.
- You can trigger an unlimited number of events at once on an unlimited number of scene element.
- You can set up timers and listeners to trigger events. So for something to happen, conditions you create might have to equal something, exceed something, not equal something, intersect, etc. And these conditions can be run in groups, so for example, you might only turn the page when the reader has paired together 4 letters to spell a word. This the cornerstone of an endless number of games.
- On-Demand Resources – This new feature allows your app’s to download resources as needed. So a 500MB binary, might only be a 20Mb download initially since the reader only needs Chapter 1 of your app at first. Click here to watch a video on this feature.
- In-App Purchasing* – Give away your book for free, then add in-app purchases to up-sell extra content. We’ll be adding support for both consumable and non-consumable purchases. Click here to watch a video on this feature.
- New Apple TV (osTV) support* – We’ve been approved for an early-release Apple TV development kit, so as soon as we can test the kit live, we’ll start adding features for it!
*Available for both Yearly Subscribers or Lifetime Access buyers of the kit.
Lets get Universal
And of course there’s PLENTY more highlights, but I’d like to steer this back to talking about Universal Apps. It is the bane of every developer to do the same thing twice for two device families. Which is usually inevitable. Why exclude one when “it’s not that much harder to choose publish to both…sigh!”. I know the feeling. Part of what makes this kit so great for publishing to both iPad and iPhone, is also what makes SpriteKit and Xcode 7 so great: the ability to work with Scene files and the SKCameraNode.
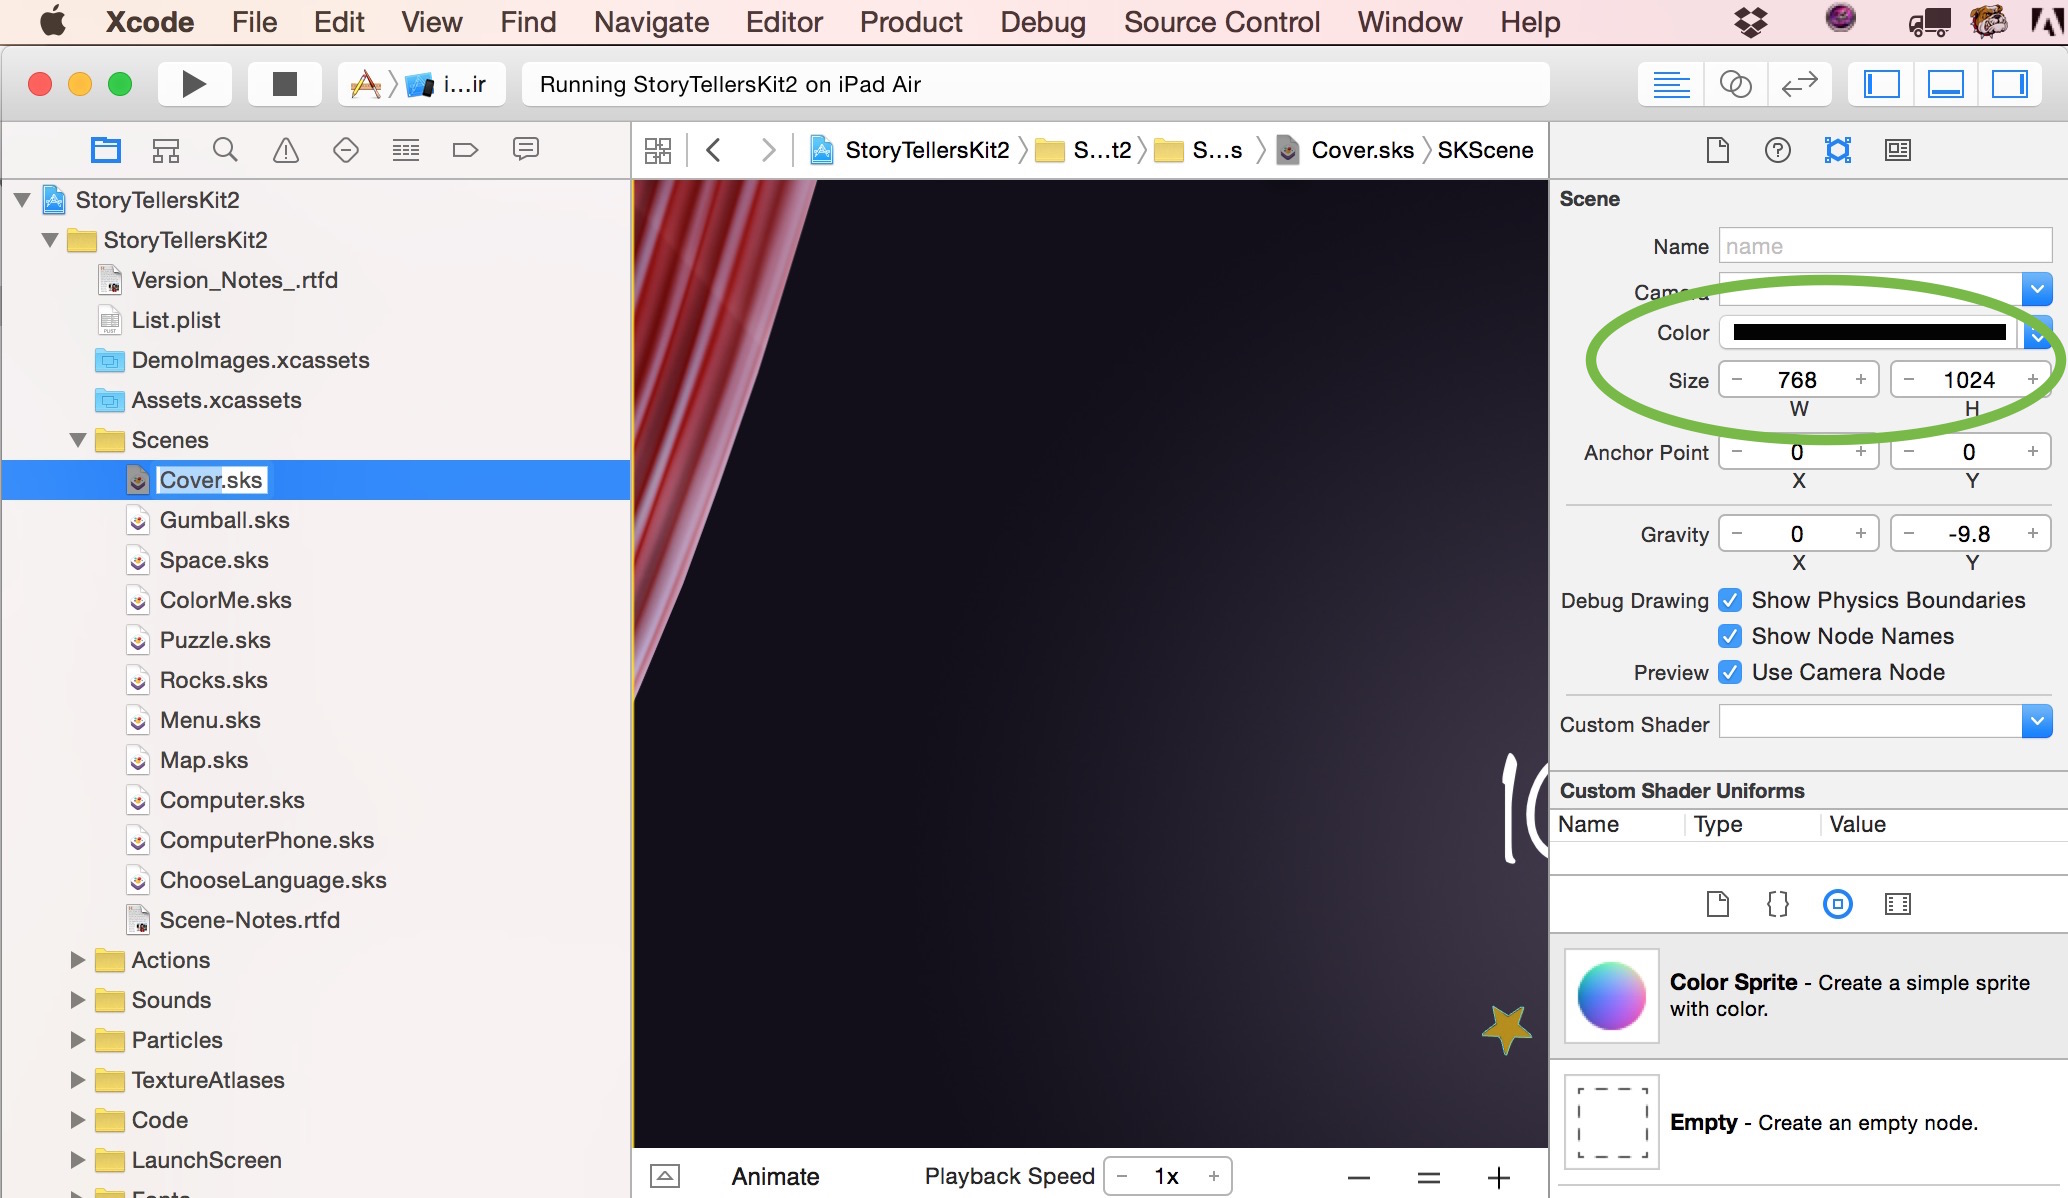
When you create a new Page for your book, you’ll start with a new SpriteKit Scene file (see the next image for reference)
Name it whatever you want, but for this example, let’s call it BalloonWorld.sks. If you want to use this same scene for both the iPhone and iPad, you probably can. If not, simply create a new SpriteKit Scene file and add on “Phone” to the end of the file name. So for example, we would make BalloonWorldPhone.sks.
![]()
Your Scene for the iPhone should have a Size setting of 736 and 414. The default is usually 1024 by 768 for the iPad. Be sure to set your iPhone Scene settings to 736 and 414, which matches the screen resolution of the iPhone 6 Plus. Not a Plus user? Not to worry, the iPhone 6 and iPhone 5 will still use these dimensions for positioning but scale down uniformly.
Cameras (SKCameraNodes)
If you want to use the same Scene for both devices, you’ll find plenty of properties in the kit that help support this. Primarily, making use of having a dedicated, slightly zoomed in (or zoomed out) SKCameraNode for the iPhone. You can add as many camera nodes to your scene as you want, but most likely you just need two (or one if you split your Scenes up by device).
If you do share a single scene for both devices, try to name the one for the phone with “Phone” at the end, and have the base name equal to another camera for the iPad. For example, your two cameras might be named “MyCamera” and “MyCameraPhone”. This way under the hood we can check for both at times.
In your page’s Settings dictionary in the property list, you set your cameras using the InitialCamera and InitialCameraPhone properties. If you do something with a camera later on, the code will check for an existing camera with the base name and “Phone” extension.
![]()
Lets Add a Color Sprite
From here you can start adding stuff to the scene. For starters, drag in a Color Sprite from the Object Library.
![]()
When creating your pages, you’ll probably use the Color Sprite for most of your layout. Technically, this is actually an SKSpriteNode, but in a moment we’ll switch it to a Custom Class of “Element”. Before you do that, set the Name property and Texture (point your eyes to the top two blue circles in the image below). The texture will obviously be the initial texture of the element, and the Name property is how we’ll identify the element later using the Property List.
![]()
Last step, set the Custom Class property to “Element”. Can’t find it? Click the icon highlighted with the orange circle in the image below….
![]()
Make the Sprite into an Element!
An Element is our own little subclass of SKSpriteNode which adds hundreds of possibilities to what’s possible. If you want any sort of significant interaction with an image in your app, it should be an Element. So get used to setting that Custom Class property whenever you add a new sprite to the scene (unless it won’t do much).
Dad, what’s a Node?
You might read the term node throughout this documentation. A node refers to multiple type “things” in SpriteKit. Most everything visual descends from an SKNode class, so node is a common term for those things. A node could be a sprite, a particle emitter, a physics vortex, a camera, etc. Heck it could even just be an Empty Node used as nothing more than a placeholder. So if you read “node” later on, that usually means the property we’re discussing could affect any node.
If the property can only apply to an Element, it will probably be noted or assumed. The Custom Class option is only available to SKSpriteNodes and SKNodes anyway, so it shouldn’t be too hard to remember who to turn into an Element. If you remember these three steps you’ll be set to laying out your book…
- Drag in a Color Sprite
- Name it
- Set the Custom Class to Element
![]()
The All-Powerful Property List
Now that you’ve set up your SKScene files, you need to create a new entry in the Pages dictionary in the List.plist file. This Property List file is what keeps you from having to ever write code! Swift 3 is a great language and I would highly recommend learning it (your purchase of the kit even includes videos documenting the making of the kit), but diving into the code is NOT needed! As an illustrator or animator, your job should just be to make this app as visually awesome and interactive as possible.
Take a moment to play around with the Property List. You can unfold or fold up Dictionary entries (which is basically a fancy term for a group). Working with a Property List boils down to making one thing equal another, and a lot of that is done in named groups.

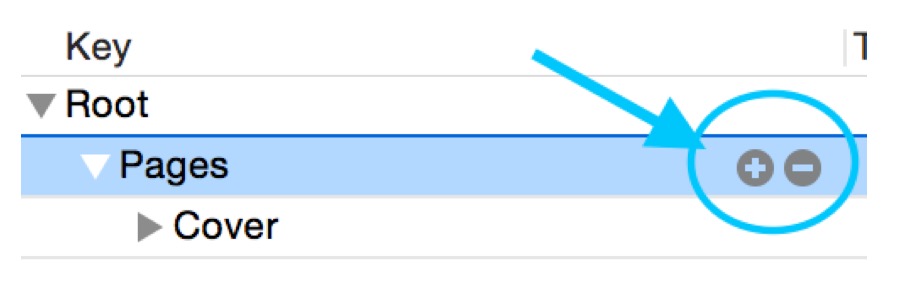
So your first (very easy) job when working with the Property List is to make a new dictionary in the Pages dictionary. First unfold the Pages dictionary, then click the same + icon you see in the image below (when adding to a dictionary, it helps to unfold it first).
By default a new item will be set to String value. Switch this to Dictionary.
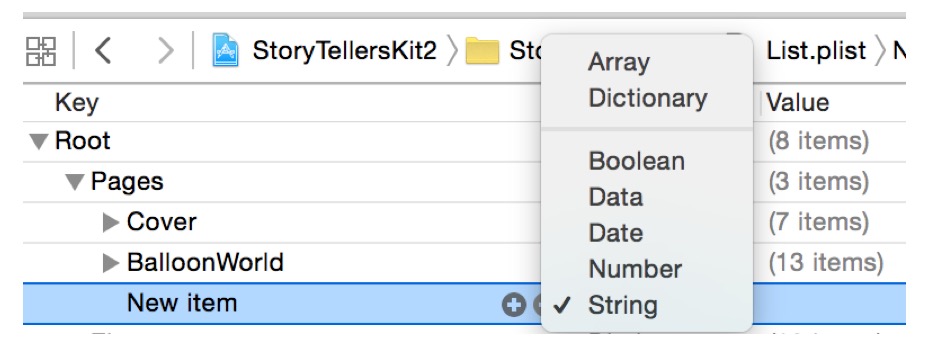
Now name the Dictionary. This should match the base name of the SpriteKit Scene file you created earlier (or want to create later). Boom. New page created! Now it just needs some dictionaries within it.
Should you make two Page dictionaries, one for each device?
If you decided to make two Scene files, one for each device, you might be thinking, “okay, so I need two dictionaries as well right?”. Well the answer is… er, probably not…. but you could.
The main difference between an iPad and iPhone is the size. Duh, right. And specifically the dimensions. The iPad in landscape mode has more height. But that’s really it.
Function wise, your app will most likely act exactly the same on both devices. Tap here, do this. Listen for something, do something else. If one thing touches another, remove one of them. Interactions like this, don’t really care about the exact position of something, they care about what’s happening to a thing and when.
Having two different Scene files handles those subtle differences in location. But worst case, you could even have differently named Elements in one Scene than another (and different corresponding Elements entries in the page). But even that is probably not needed because there are some properties that have device-dependent options. With all that said, you CAN simply create a second phone-specific dictionary by taking the base name and adding “Phone” to it.

This is possible! Just probably not necessary.
Defining Elements in the Root or Pages Dictionary
You’ve already seen how to add a Color Sprite to your Scene, texture it, and give it a Custom Class of “Element”, but now what? The special properties you want to infuse in your elements are defined in a dictionary named Elements in either the current page dictionary, or alternatively in the Root, also with the name Elements.

So each of your page’s can have their own Elements dictionary or if your element is used among many different pages you can simply put the data in the Root. Since elements can do or be anything visually, this could include the data for menu items or common things, like a pause button. Those type elements might be better off defined in the Root Elements dictionary instead of on a page-by-page basis. Generally speaking, if the element is on more than one page, and does the same thing every time, it’s best defined in the Root.
Code-wise, when a page is loaded and the kit tries to pair Elements in the scene to those in the property list, priority is given to entries defined in the page dictionary over those in the Root. So if a match is found for UpButton in the page’s Elements dictionary and one also exists in the Root’s Elements dictionary, the Root one is ignored.
Labels work the same way!
Your scene’s Labels (SKLabelNodes) can also be defined on a page-by-page basis or in a dictionary in the root.

You can add them to your Scene file by dragging one in from the Object Library.

Labels don’t have a Custom Class option, but you can give them a Name property, and this value that is used to pair them in the Property List. So for example, notice the Label in the Scene below has a Name of “UserName”.

The Property List in the Cover page dictionary has a Labels dictionary which has an entry named UserName. The values within that dictionary will alter the label.

If you’re curious about this particular example, it shows that the actual text seen by the reader will be equal to TextWithSavedValue (the saved value is coincidently also named UserName) which could be any saved value. Think of saved values like variables. In this particular example, it is the reader’s name (which was input from other properties using the iOS keyboard).
The TextIfNoSavedValue is “You,” so if the book had just opened for the first time, the Label would use this as the base text. The Prefix and Postfix options add text before and after the base text.
So once published the Label would potentially be…
“Hi Justin, Welcome back!” or “Hi You, Welcome back!” if it was the first time being opened . We’ll talk more about Labels later.
Page Order
The PageOrder dictionary in the Root will define Arrays for the page order of the book. You don’t have to define a page order, but you can. And you can define it by chapter, theme, interest or whatever.
You might be wondering, what an Array is. An array is an ordered list. “Ordered” is the keyword there, because the code will sort these items in the same order you arrange them. Dictionaries on the other hand are unordered and their arrangement from top to bottom is arbitrary.
Here are some example events that use the PageOrder arrays are…
- NextPage – The value should equal the name of an Array in the PageOrder dictionary. For example, Chapter1. The kit will choose the next page to go to by finding the current page in the order and open the next one.
- PreviousPage – The value should equal the name of an Array in the PageOrder dictionary. For example, Chapter1. The kit will choose the previous page to go to by finding the current page in the page ordering and open the one before it.

The PageOrder dictionary gives you a convenient way to organize sections and use a single button to move forward (or backward). Of course you also have event properties to jump around to ANY page, even random ones. You also have the option to Continue from the last page read.
Pools / Action Pools
Pools can contain Arrays that you’ll use for various purposes. For example, you could…
- List potential random pages to open.
- List random snippets of text (for Labels)
- List random texture names.
- List a series of saved values to cycle through.
- List random values for a mini-game. For example, you might set a random word value from a list of dinosaur names when the page opens. That value could be used for a listener event, texture, etc.
ActionPools contain dictionaries with Action names for keys and nodes to apply those actions to for the value. ActionPools give you convenient place to store actions (or more likely groups of Actions) you’ll want to run over and over again on multiple pages.

ActionPools contain dictionaries with Action names for keys and nodes to apply those actions to for the value. ActionPools give you convenient place to store actions (or more likely groups of Actions) you’ll want to run over and over again on multiple pages.
We’ll discuss the properties regarding Pools and ActionPools later on.
Reference Files
Xcode 7 allows you to create .sks files and drag them into other .sks files as a Reference. Basically this is a group of objects you can layout independent of your Scene. And of course you could use these across multiple pages.
The kit fully supports reference files! These are great for re-usable elements and in particular thumbnail menus to jump to other pages…

Switching from Landscape to Portrait
By default the kit is setup as a Universal app in Landscape mode for both iPhone and iPad. To switch it to Portrait only (or to support Portrait as well as Landscape), do the following steps.
Step 1: In the general settings, under Deployment Info, toggle on Portrait and Upside Down. Optionally, you can toggle off Landscape Left and Landscape Right.

Step 2: Find the Info.plist file. It is grouped in the Fonts folder because editing the Info.plist file is an essential part of adding custom fonts. Unfold Supported Interface Orientations, change Landscape to Portrait, as seen in the selected item in the next image. The editor will suggest orientation options when you click it. Note there are two Arrays to do this for (one is for the iPad). If you want to support Landscape as well as Portrait, don’t delete the Landscape ones.

Step 3: Switch any scenes to the correct portrait dimensions. For iPad SKScene files (or ones being used for both iPad and iPhone), width would be 768 and height would now be 1024. For iPhone only Scene files, width would be 416 and height would be 736. Both are just the reverse of what they were previously.
Step 4: In the AppDelegate.swift file, change
return UIInterfaceOrientationMask.Landscape
to
return UIInterfaceOrientationMask.Portrait
or
return UIInterfaceOrientationMask.All
Note. Step 4 is only needed as of Build 1.07.

Changing the Icon Name
To change the display name under the icon of the app on the device’s home screen, find the Info.plist and look for Bundle Display Name…
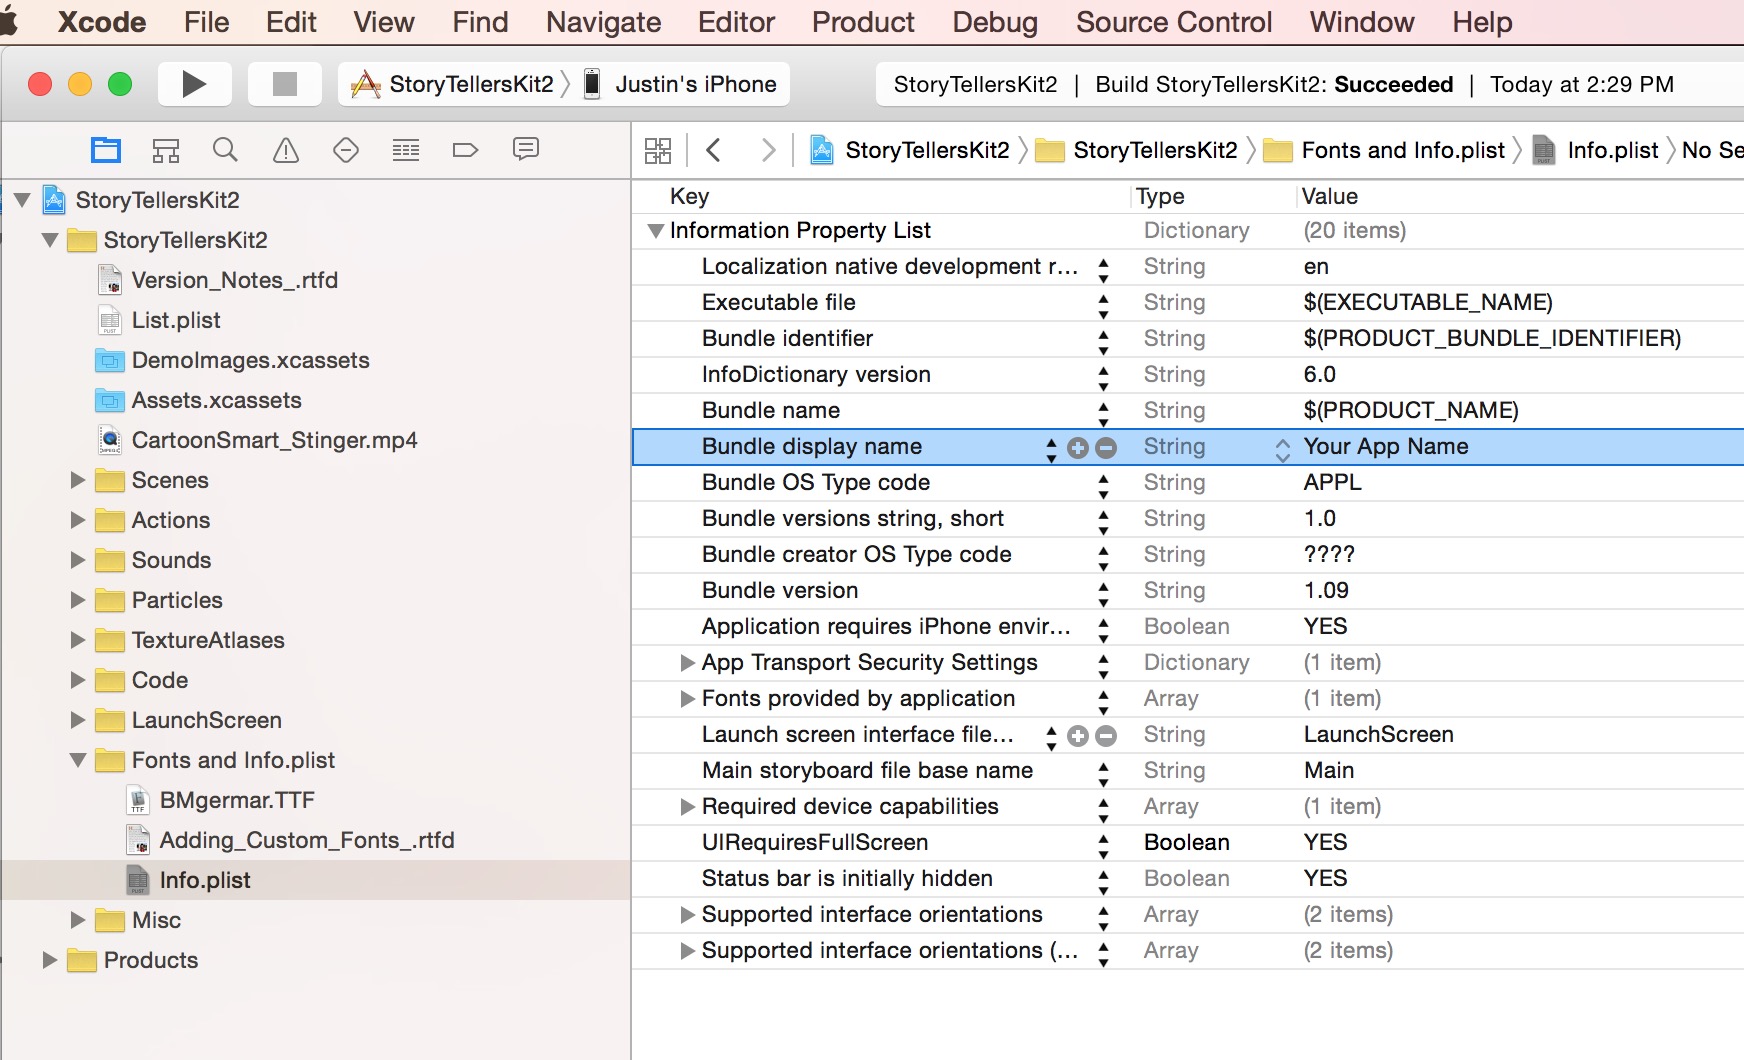
Note: Do not change the project name. That has no affect on the icon name or name in the iTunes store.
Adding Your Own Code (unnecessary, but possible)
We understand that although this kit was created for those of you less code-savvy folks, we’ll have plenty of buyers that know their way around Swift 3. So if that’s you, keep reading.
There are two main classes in this kit: Element and Page. The kit already includes extensions of those classes for you to write your own code. Element_Extension.swift and Page_Extension.swift are yours! If you update the kit from say, v1 to v1.1, you would not want to override those two files since those could contain your own code.
You can use these for whatever you want. And both are already setup to pass Event values into them from the main kit. So for example, if you touch down on an Element and want it to do something in particular that’s not already in the kit, you can check the key value using eventName and value using eventValue. You can see what I mean under the //WARNING note in the example image.

Video review…
A lot of the material we’ve covered above is also touched on in the video below. And there’s plenty we didn’t cover, so for a well-rounded introduction to the kit, spend some time watching this video as well….
