Using Pictures from the Camera / Camera Roll
Story Tellers iOS Starter Kit 2 Documentation
As of Build 1.07, the Story Tellers iOS Starter Kit 2 can now get images from the device’s Camera Roll or take a new photo, then bring it into the Scene. The picture can be used as is, or masked. The picture gets saved to the NSUserDefaults and can be brought in again from any other page afterwards, with the previous mask (or a different mask) including any adjustments made to the location / size / rotation of the mask. Since the picture data is saved in the NSUserDefaults, it will persist for as long as the app is installed.
This adds a lot of fun possibilities to the kit, since you could have the reader take their own photo and use it as a character’s head in the book.

You can
Don’t want to read? Watch how this works below…
![]()
Events to Pick / Take an Image
There are four events to pick a photo from the camera roll or take a new one. If your event to trigger getting a photo is based on a touch event (like touching a button), it is recommended you use TouchUpEvent instead of TouchEvent.
- PickPhoto – no value is needed. The app will attempt to access the camera roll (the user must grant access for the app on the first attempt).
![]()
- TakePhoto – no value is needed. The app will attempt to access the camera to take a new photo (the user must grant access for the app on the first attempt).
![]()
- PickPhotoWithMask – the value should be an image in an asset catalog to use as a mask. The app will attempt to access the camera roll to pick a photo (the user must grant access for the app on the first attempt).
![]()
- TakePhotoWithMask – the value should be an image in an asset catalog to use as a mask. The app will attempt to access the camera to take a new photo (the user must grant access for the app on the first attempt).
![]()
Events to Re-show a Previously Chosen Image
Any page can show a previously chosen image. As always, you must have a Color Sprite or Empty Node in the scene as a placeholder, named “CameraRollPlaceholder”. The two events are…
- ShowSavedImage – no value is needed. The app will show the last selected image.
![]()
- ShowSavedImageWithMask – the value will be the image to use as a mask. This could be a previously used mask or new one. Keep in mind any adjustments made to the mask location / size / rotation will be used again.
![]()
Events to Adjust the Mask
After the image is added to the scene, it has a name of “AdjustMask”. So you’ll notice all the properties below make reference to a node named “AdjustMask”. Keep in mind, technically, these adjustments are made to the image being masked. So the parent node containing the masked image is not moved / rotated or resized. If you’re curious that parent is named “CameraRollPicture”, and could be manipulated if need be.
The “AdjustMask” is an Element class instance, so you could treat it like any other Element (and include properties in the page’s Elements dictionary for “AdjustMask”). That isn’t necessary though for any of these properties to work.
- MoveMaskRight – the value for this event should be a positive number, which will move the mask that amount to the right.

- MoveMaskLeft – the value for this event should be a positive number, which will move the mask that amount to the left.
- MoveMaskUp – the value for this event should be a positive number, which will move the mask that amount upward.
- MoveMaskDown – the value for this event should be a positive number, which will move the mask that amount downward.
- ZoomMaskDown – the value for this event should be a decimal number (small number basically), which will scale down the size uniformly that amount. We recommend an amount around 0.05 to 0.1 (5% to 10%)

- ZoomMaskUp – the value for this event should be a decimal number (small number basically), which will scale up the size uniformly that amount. We recommend an amount around 0.05 to 0.1 (5% to 10%)
- ScaleXDown – the value for this event should be a decimal number (small number basically), which will scale down the size horizontally that amount. We recommend an amount around 0.05 to 0.1 (5% to 10%)
- ScaleYDown – the value for this event should be a decimal number (small number basically), which will scale down the size vertically that amount. We recommend an amount around 0.05 to 0.1 (5% to 10%)
- ScaleXUp – the value for this event should be a decimal number (small number basically), which will scale up the size horizontally that amount. We recommend an amount around 0.05 to 0.1 (5% to 10%)
- ScaleYUp – the value for this event should be a decimal number (small number basically), which will scale up the size vertically that amount. We recommend an amount around 0.05 to 0.1 (5% to 10%)

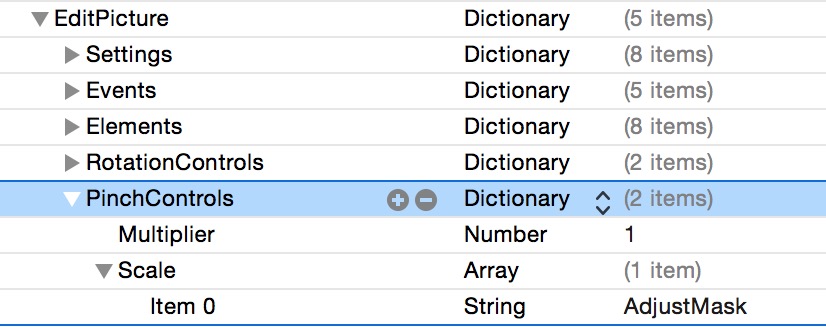
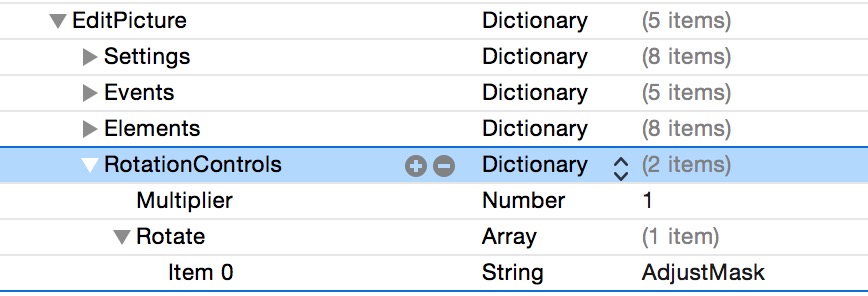
Gesture Controls
In the example images below EditPicture is the name of a page for editing the image. Your page can be named anything of course.
- PinchControls – (added as a dictionary in the page dictionary) defines nodes to be scaled up or down by pinching. If you include “AdjustMask” the kit will scale up and down the image inside the mask and save that value in the defaults. The Multiplier property will either decrease or increase how quickly the image is zoomed in or out.
- RotationControls – (added as a dictionary in the page dictionary) defines nodes to be rotated by the user making a rotation gesture on the screen. If you include “AdjustMask” the kit will rotate the image inside the mask and save that value in the defaults. The Multiplier property will either decrease or increase the rotation rate.
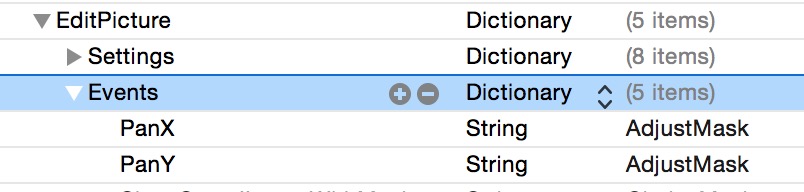
- PanX and PanY – (Event properties) if you want the user to be able to touch the screen and move the image inside the mask, you can use the PanX and PanY properties like so…
Saving Images
You can save either the entire screen or specific nodes to the iOS camera roll from your SpriteKit scene using the following properties…
- SaveScreen – no value is needed.
![]()
- SaveNodesToCameraRoll – The value should be an array that lists the nodes to save to the camera roll. The order does not matter. Technically each node is copied into a new SKNode, the image data is saved, and then the node is cleaned out.
![]()
Showing Back the SaveScreen image
If you want to show the last saved image (using the SaveScreen property above), you can do so with the following event.
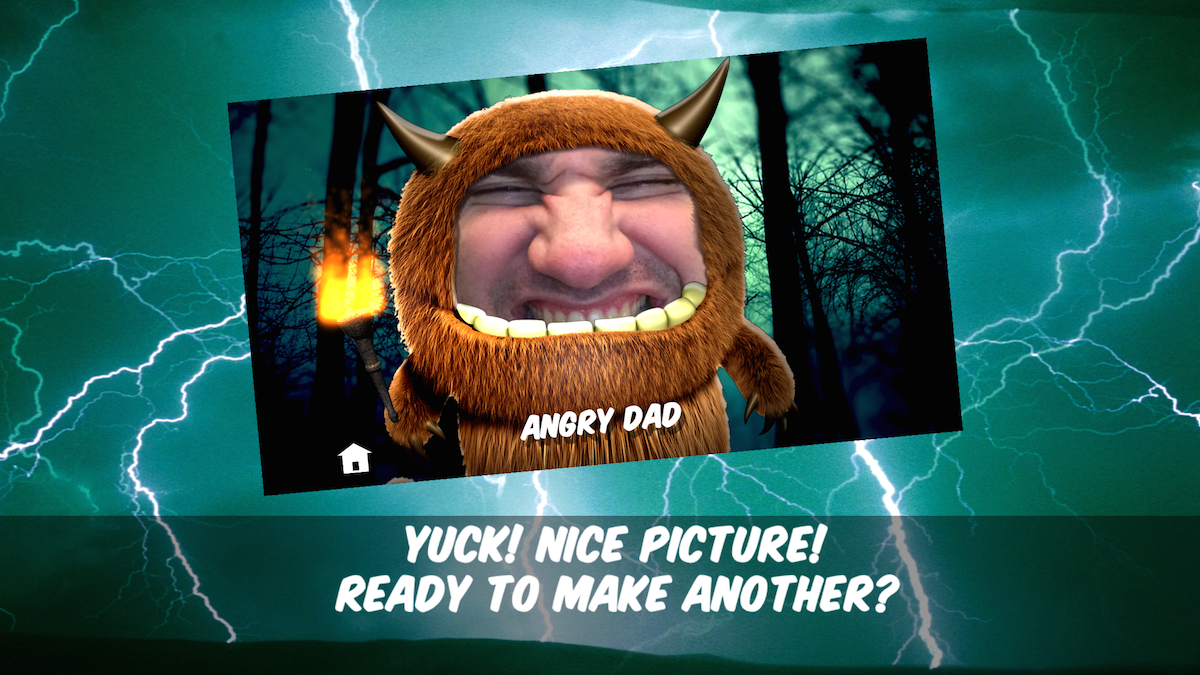
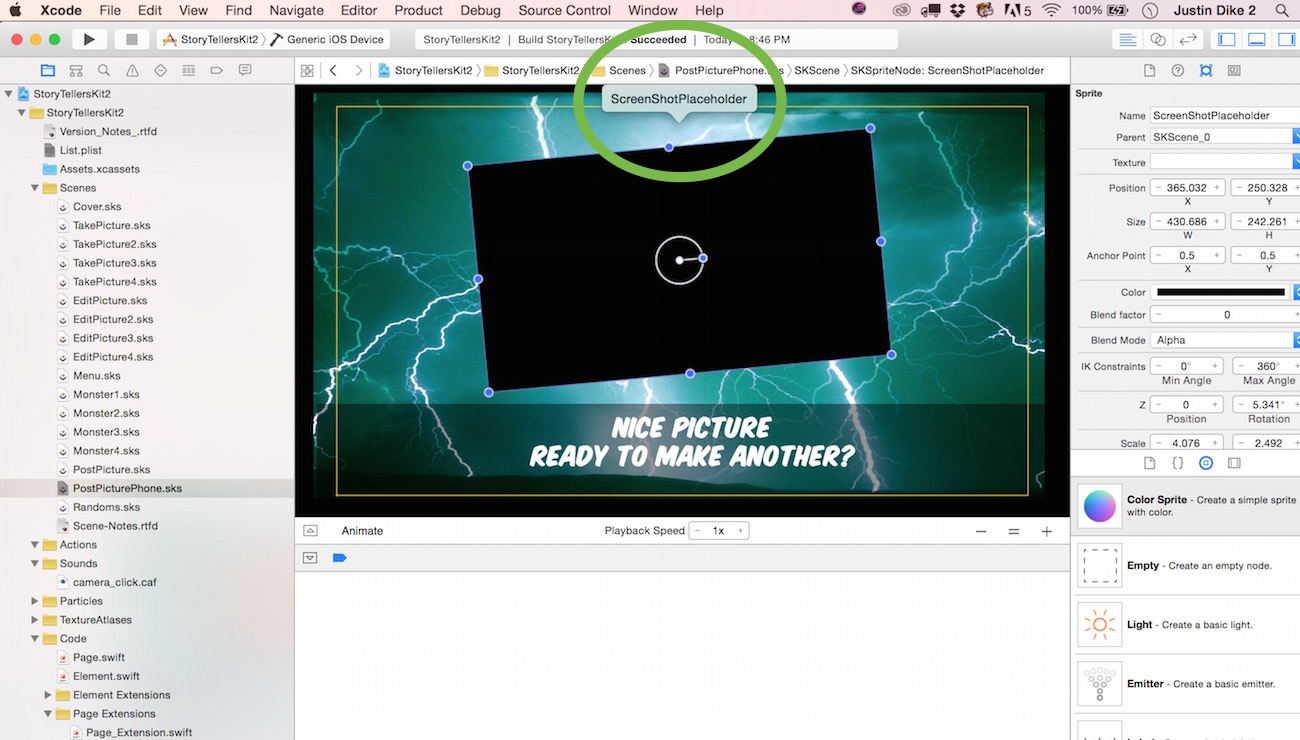
- ShowLastScreenshot (Event) – requires a sprite in the scene with the name “ScreenShotPlaceholder”. This will be replaced with the last screenshot saved.
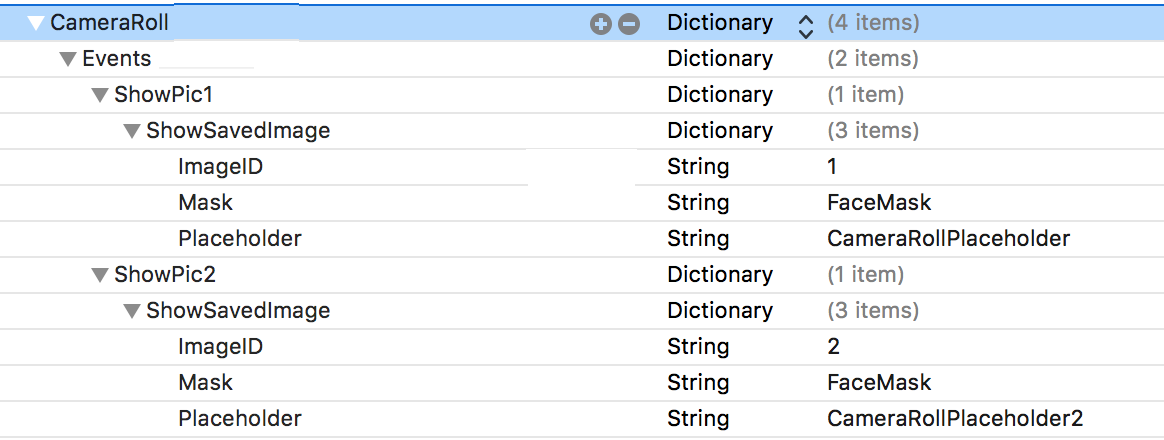
Showing / Masking More than One Image
- ImageID – just an arbitrary ID for the image,
- Mask – the image in the asset catalog to use as a mask
- Placeholder – any placeholder sprite in the scene