The Player1 and Player2 sub-dictionaries (inside the Players dictionary) have a lot of properties so you can create the perfect player for your game. Let’s take a quick look at an example…

Where to Add a Players Dictionary
You do not need to add a Players dictionary on every level, but you can. So notice in the example below, there are two circled Players dictionaries. One is within Item 1 inside the Levels dictionary, and the other is in the Root of the property list….

In this example the second level of the game (which is Item 1) will find the Players dictionary for this particular level and use that information to define the player’s data (which is everything about the player: their bullets, physics, sounds, animation, etc). If the level does not find the Players dictionary here, it will revert to looking for one in the Root of the property list.
So you could change the players every level if you wanted. Or you could define the players once and be done with it.
Physics Properties
You do not need to setup a physics body for your players in the scene file. By default players have a circular physics body setup by the code in the Player.swift class. In the property list, you can change this to a rectangular physics body or one based on the alpha data in the base image of your player. You can see the physics of your players (and every other object in your game) by finding the GameViewController.swift file and changing showsPhysics from false to true.

Here are all the physics properties for the players…
- BodyType – This should be a value of either Circle, Rectangle or Alpha. If you choose Alpha, it will create a body shape matching that of the texture itself. If you use this, you don’t need to set the other body options below.
- BodySize – This property only affects bodies with a Rectangle type. The property should be written in this format… {width, height} … for example {50,120} meaning the rectangular shape is 50 points wide by 120 points tall.
- RadiusDivider – This property only affects bodies with a Circle type. This value divides the width of the image to determine the radius of the circle defining the body. Sound complicated? Experiment with decimal values from 2 to 3 and you’ll probably find the exact size you want. The higher the number the smaller the physics body gets. To the point that you might notice the character’s legs are lower than the platform they are standing on. Which brings us to the next property.
- BodyOffset – The property can be used with both Circle and Rectangle bodies, to offset where the body is in relation to the image of the character. This value is written in the following format… {x, y} … for example, {0,-5} would not move the body at all on the x axis, and nudge it down 5 points on the y axis. Either number can be positive or negative.
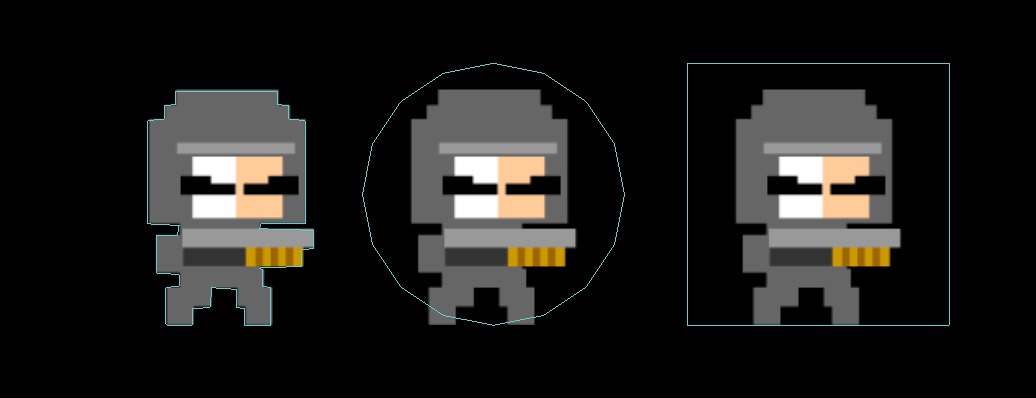
The image above shows the physics bodies using Alpha, Circle and Rectangle. Notice the Circle and Rectangle bodies could be considered a little large. You can tweak the physics shapes to make the perfect sized body regardless of the size of your source images for the player.
Animation Properties
Animation is completely optional with the kit. If you want to include animated frames for the player idling, walking, running, shooting, jumping, dying or climbing, you’ll do so by creating an atlas folder with all the animated frames, then importing that to the kit. You can make an atlas folder, by simply creating a folder on your desktop or anywhere else on your Mac, then adding “.atlas” to the end of the folder name. Add your frames to this folder now. You can then drag and drop it into Xcode. Anytime you add assets to the kit that will be used for both iOS and tvOS, be sure the following options are toggled on…

You always want Copy items if needed toggled on, and Add to Targets should always be checked (if not, your art won’t be added to the app binary). The middle option doesn’t really matter.
Atlases are convenient way to import sequences of images for a couple reasons. They are optimized by Xcode at runtime into a sprite sheet. And organizationally the .atlas folder is consider a single imported resources. So you can add or delete anything to the .atlas folder after importing it, and Xcode will recognize that files were modified. Which is easier than adding, removing or changing large numbers of sequential images in the Game.xcassets catalog (which is traditionally where imported images go).

If you add more images to atlas folder than Xcode can optimize into a single sprite sheet, Xcode will tell you the files have been split into 2 or more sheets (if so, just ignore that warning).
Important: All frames should be Right-Facing, meaning the character is facing the right.
Saving Actions for character animations
Once you’ve imported your .atlas folders, open the Actions.sks file…

This SKS file is used for saving actions to be used later in the game, in particular our character animations. To create a new action, tap the + sign (see where the arrow is point below)…

Now name the action (this name is what will be used in the property list later).
Next, go to the Object Library (pointed to in the image below) and find Animate with Textures.

Drag this to the timeline under the new action you just created.
Now you can switch over to the Media Library tab (pointed to in the image below) and drag images from there, into the Textures section of your Animate with Textures action.

Finally, we can head back to the Property List and enter the action name into the Animation dictionary.
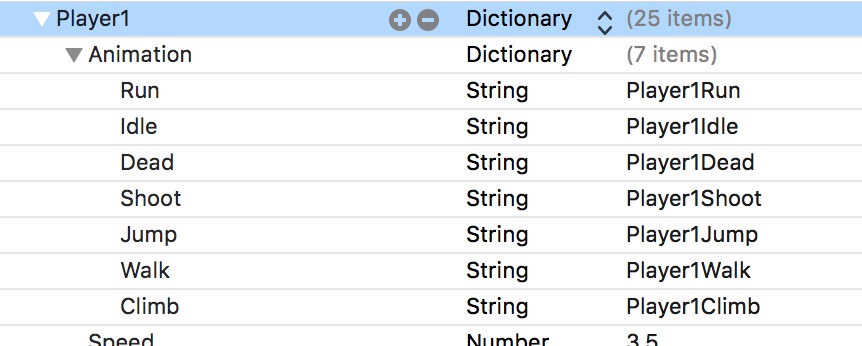
You can include the following options in the Animation dictionary …
- Walk – the value will be the name of a saved action for the player walking (or moving however your player moves)
- Run – the value will be the name of a saved action for the player running. The action only runs if the user is playing your game with an external game controller (and holding down the Firing button).
- Idle – the value will be the name of a saved action for the player not moving
- Dead – the value will be the name of a saved action for the player dying
- Shoot – the value will be the name of a saved action for the player shooting
- Jump – the value will be the name of a saved action for the player jumping
- Climb – the value will be the name of a saved action for the player climbing
Control Properties
- Speed – this is base speed of the player. The default is 4 if this value is excluded.
- SpeedBoast – this amount is added to the player when they run (if the firing button is held down after firing). The default is 0 if this value is excluded.
- ClimbSpeed – this is how fast the player climbs. The default is 2 if this value is excluded.
- JumpAmount – this determines how high the player jumps. The default is 500 if this value is excluded. A range from about 500 to 900 is normal.
- DoubleJumpAmount – this determines how high the player double jumps. The default is 0 if this value is excluded, which means double jumping is disabled. Experiment with a value of 500, and raise or lower to your liking.
- ReviveTime – a number value for how long it takes for the character to respawn after losing a heart (life).
Weapon Properties
Players define the look and properties for their weapons. You can think of weapons as any kind of projectile: small axes, throwing stars, lasers, hamburgers, etc.
- WeaponImage – the name of the image to use as a projectile. Do not include the file extension.
- WeaponAnimation – the name of a saved action in your Actions.sks file. This optional property can be used if you want your bullet to have a texture animation, fade, scale, etc.
- WeaponExplosionAnimation – the name of a saved action in your Actions.sks file. This optional property can be used to show an explosion animation when the players weapon hits a platform or enemy.
- WeaponSpeedX (or just WeaponSpeed also works) – a number determining how fast the weapon travels. The default is 10.
- WeaponSpeedY – an optional number to add some positive or negative vertical force
- RightStickAdjustsSpeedY – if you want the WeaponSpeedY property to change based on the right thumb stick of an external controller, set this value to YES. For example, if WeaponSpeedY is 2, then pressing down on the right thumb stick controller would change the value from 0 to -2. Or pressing up would change the value from 0 to 2.
- OnlyAdjustYWithController – set this value to YES if you only want the WeaponSpeedY to be used when the player has an external game controller. If they do not, the WeaponSpeedY value goes back to 0.
- WeaponRotationSpeed – a number determining how long it takes for the projectile to rotate 360 degrees. The default is 0, which means the projectile will not rotate at all. If the value was 1, then the projectile would take 1 second to do a full rotation.
- WeaponDelay – a number value for the time to wait before the projectile is release from the player. The default is 0. You might want to set this to a small decimal, if the player’s shooting animation frames display the weapon in hand initially. For example, if the player’s animation pulls back an axe prior to throwing it.
- WeaponOffset – a value in {x, y} format to offset where the projectile initially appears in relation to the player. The default is {0, 0} but most likely you will want to reposition where the weapon appears some. For example, a value of {100, -10} would start the projectile 100 points to the right of the player (if they were facing right) and 10 points lower than the player’s y location. If the player were facing left, the kit knows to start the project 100 points to the left.
- TimeBetweenFiring – a number value for how long to wait before the player can fire again. The default is 0.2, or 1/5 of a second.
Health Properties
- Health – a Number value for the health of the player (or the amount of damage the player can take). For example, a value of 0 would kill the player right away when hurt. With value of 10, the player would need to be hit 10 times to lose a life.
- ReviveTime – a number value for how long the player is immune from getting hurt again after taking damage.
- HealthMeter – an optional Array of image names to indicate the player’s health. This could be an visual representation, it doesn’t necessarily have to be a “meter”. You can see in the example below, the player’s health is 10, and the HealthMeter array contains 10 images. After the first hit on the player, the image asset named HealthMeter10 would appear. And so on.
- HealthOffset – a String value in {x, y} format to adjust where the health meter image appears in relation to the player’s center. So {0, 35} would move up the image vertically by 35 points, but not shift it on the x axis.
- HealthFadesAfter – an optional Number value for how long the health meter stays visible for. If 2 is entered, the meter image would fade after 2 seconds. Exclude this option, if you don’t want the meter to fade away.
- PushBackAmountWhenHurt – a Number value for how much the player is pushed backward when hurt. If excluded, the default for this value is 50. Increase or lower to your liking.

Sound Properties
Players define their own sounds using the following properties.
- SoundJump – the sound when the player jumps, including the file extension.
- SoundLand – the sound when the player lands on a platform, including the file extension.
- SoundLoseHeart – the sound when the player loses a heart (life), including the file extension.
- SoundDead – the sound when the player dies, including the file extension.
- SoundBounce – the sound when the player bounces on another player or enemy, including the file extension.
- SoundShoot – the sound when the player shoots, including the file extension.
- SoundBulletImpact – the sound when the player’s weapon impacts something, including the file extension.
- SoundNoAmmo – the sound when the player has no ammo, including the file extension.