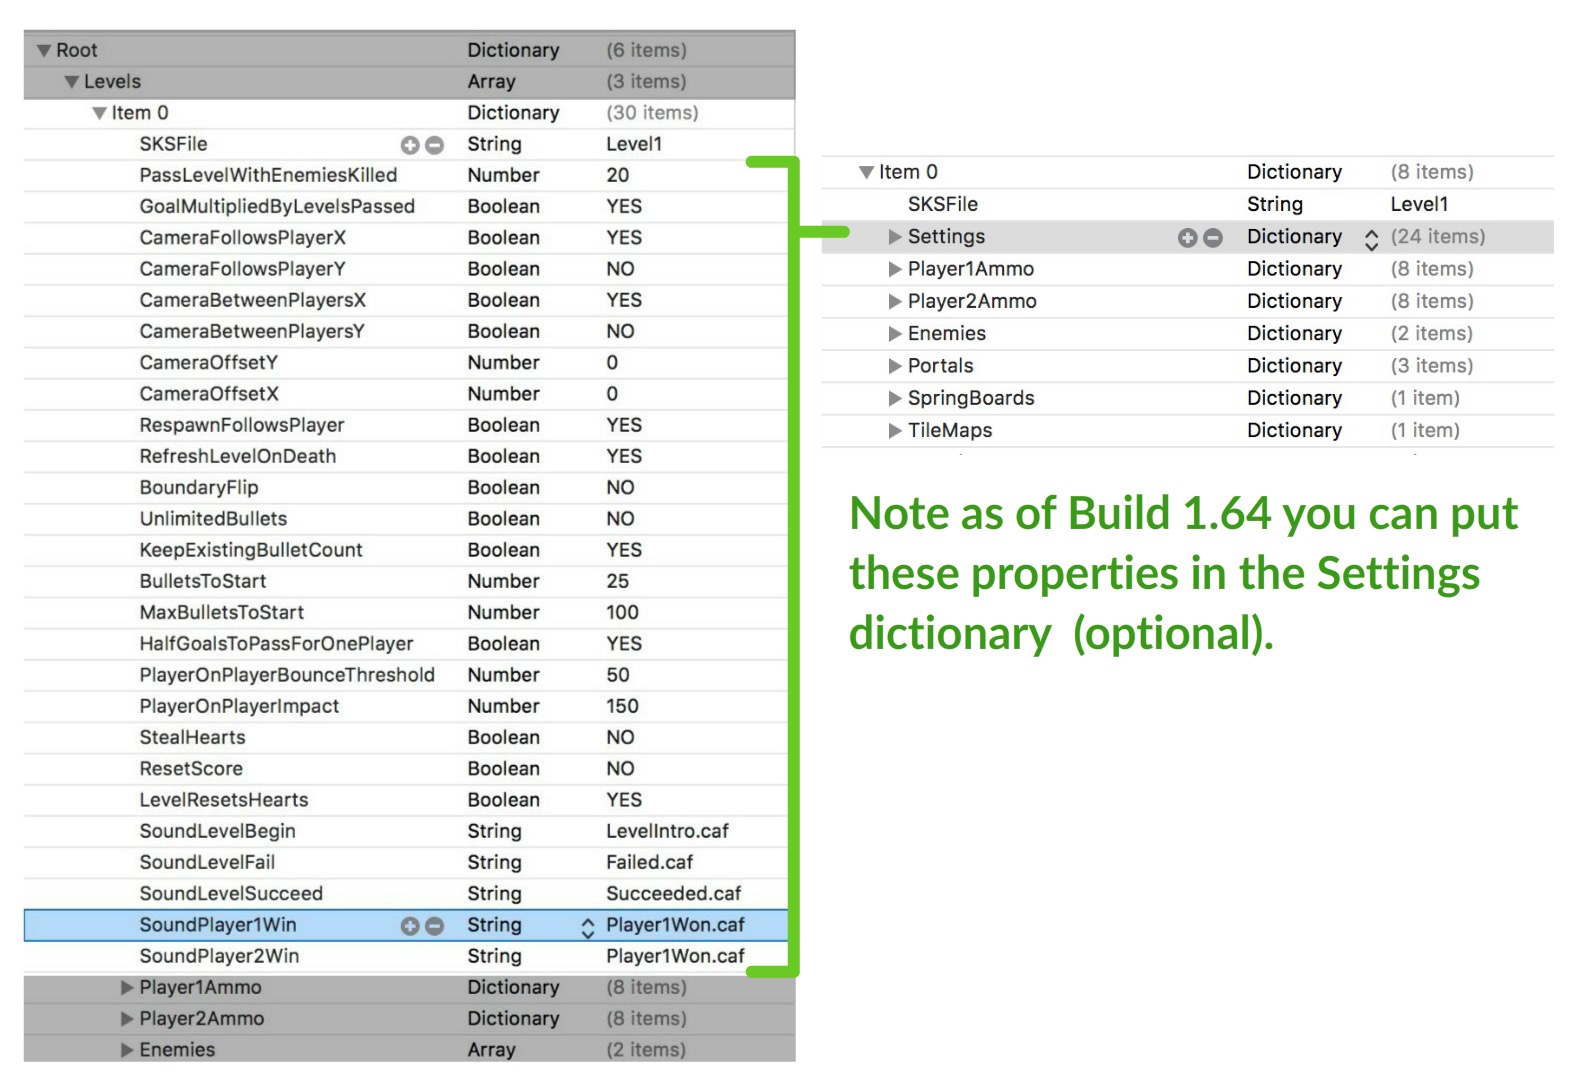
Each level in your platform game can have different properties from the last level, different ammo drops/rewards, different enemies, and even different players. Below lets focus on just the basic properties for each level. You can see within the Levels Array, Item 0 (the first level) has been unfolded, revealing all the data for this level….
You can also include separate device specific Settings folders by naming them SettingsPhone, SettingsPad, SettingsTV. For example..

Any property you include in these folders would override the same named property in the Settings folder.
The single most important property, your SKS file…
Every level needs to define it’s .sks file (the scene file). You’ll do so with this property…
- SKSFile – the base file name, minus the .sks extension. For reference, see the image below.

You can have an unlimited number of scene files, so each item in your Levels array could point to a unique .sks file, or level items could reuse the same .sks file. For example, the first few levels might re-play the same scene, but with more enemies being spawned.
You can optionally include device specific scene files, for example, Level1Pad.sks, Level1Phone.sks or Level1TV.sks. If you do this, the SKSFile property still only requires the base name of Level1. The code will check to see if an alternate “Pad”, “Phone”, or “TV” extension version exists and load that if so.
Scene Size
The demo levels for the kit are set to 1920 by 1080 for the iPhone and TV, and 2048 by 1536 for the iPad. If you choose these same sizes, you don’t need to include 2x or 3x images in your game, since your scene will be scaled down on the iOS devices. The screen size for the TV is 1920 by 1080 and only requires 1x images. Point is, by upsizing your iOS scenes, you can probably use that same level for the iPad or TV. Or you can design a level for the iPhone, then duplicate the scene for the iPad or TV, and make minor adjustments if needed.
Camera Related Properties…
Every level should have a camera in the scene named “TheCamera”. When creating new scenes, you can go to File> Duplicate to make a new .sks file, which would of course include the existing camera. For reference, here’s what the camera looks like in your scene…

The camera can simply stay put in the level, or the camera can follow your player(s) using the following properties….
- CameraFollowsPlayerX – a YES or NO value to set whether the camera follows the player horizontally along the x axis. If your level is wider than the default scene size, you’ll want to set this to YES. By default the camera will center the main player horizontally. In a two player game, the camera will go back and forth between following the player that has lost a heart (life) least recently. So if Player1 loses a heart, the camera will switch to following Player2.
- CameraFollowsPlayerY – a YES or NO value to set whether the camera follows the player vertically along the y axis. If your level is taller than the default scene size you’ll want to set this to YES. By default the camera will center the main player vertically. In a two player game, the camera will go back and forth between following the player that has lost a heart (life) least recently. So if Player1 loses a heart, the camera will switch to following Player2.
- CameraBetweenPlayersX – a YES or NO value to set whether the camera is centered horizontally between Player1 and Player2 in a two player game. If a player dies, the camera will revert to following just the remaining player.
- CameraBetweenPlayersX – a YES or NO value to set whether the camera is centered vertically between Player1 and Player2 in a two player game. If a player dies, the camera will revert to following just the remaining player.
- CameraOffsetX – an optional number value to reposition the camera horizontally after the settings above have positioned the camera. Most likely, you’ll want to keep this at 0 (or just delete the property).
- CameraOffsetY – an optional number value to reposition the camera vertically after the settings above have positioned the camera.
- CameraXLimitRight – an optional number value to limit how far to the right the camera can go horizontally.
- CameraXLimitLeft – an optional number value to limit how far to the left the camera can go horizontally.
- AutoMoveCamera – a String value in {x, y} format to automatically move the camera. So a value of {1,0} would move the camera horizontally 1 point every frame, but would not move the camera at all vertically. If you set this property, you probably want to create an invisible sprite with a Custom Class of DeadZone and set it’s Parent property to that of TheCamera. If you position the DeadZone just out of sight on the left side of the camera, if the player can’t keep up with where the camera is moving, the player is immediately killed off. Think of all the Super Mario Bros boards that did this.
- ForceCameraToStartAt – a String value in {x, y} format to force a camera inside an SKReferenceNode to start at specific spot instead of the middle of the scene. For example, {100,0} . By default, if your camera (and GUI children within the camera) are inside of an SKReference node, the camera is placed at x:0, y:0 when the level begins.
Player Properties…
As of Build 1.68, you have two new properties to specify a dictionary name for the data of each player.
- Player1Name – the name of the sub-dictionary (in the Players dictionary) for player 1
- Player2Name – the name of the sub-dictionary (in the Players dictionary) for player 2
See the image below for an example…

So now your Players dictionary can have as many sub-dictionaries as you want.
Properties to Pass the Level…
The following properties can be used to advance to the next item in the Levels array. So for example, if the player is on Item 0 (the first level), and they pass the level, they will go to Item 1 (the second level). And so on. If the level is passed on the last item in the Levels array, then Item 0 is used again.
- PassLevelWithEnemiesKilled – the number of enemies to kill to pass the level. If you include an SKLabelNode in the scene named “KillCount”, this will automatically update with the current number killed and amount needed to pass.

- PassLevelWithScoreOver – a number value for the score to exceed to pass the level.
- CombineScoresToPassLevel – By default this value is set to YES anyway, so excluding it as a property keeps it as YES. This property combines the scores of Player 1 and Player 2 when checking to see if the level should be passed. So it only affects two player games anyway, and it will probably make the most sense for players to see a single combined score rather than two separate scores if the intention is to pass the level at a certain point. If you include an SKLabelNode in the scene named “CombinedScore”, the kit will automatically update the label with the current score and the amount needed to pass.

- GoalMultipliedByLevelsPassed – Set this property to YES and the PassLevelWithScoreOver / PassLevelWithEnemiesKilled values will be multiplied by the number of levels passed. So for example, if the player is on Level 17 and PassLevelWithEnemiesKilled is 10, then the amount is 170 total to kill. This is particularly useful if the player passes every level then goes back to playing Level 1 again, since the number of levels passed is not reset. So for example, the player might go back to Level 1, but 18 levels have been passed, making Level1 much harder than before.
- HalfGoalsToPassForOnePlayer – a YES or NO value to half the goals if the game is in single player mode. By default this is set to NO.
- MinimumEnemiesToPass – If you chose to use GoalMultipliedByLevelsPassed, this value could be lower than expected if you decide to create a menu with buttons that jump to specific levels. You might decide to set a value for this property to note the minimum number required to pass the level.
- AutoAdvanceLevelTime – The number of seconds to wait before automatically advancing the level. This is useful for bonus levels, where the player might get an opportunity to collect a lot of coins in a short amount of time. If you use this property, be sure to include a sprite in the scene named “TimesUp”, which will display for a couple seconds before advancing the level.

Note: Levels can also be passed by contact Portals which don’t require properties to be set in the level.
Sound Properties…
The following properties can be used to play sound at certain points of the game. Each of the values should include the sound file name including the extension. Apple recommends .caf format for short sounds in games, but .mp3 and some other formats work as well. These sound files do not loop….
- SoundLevelBegin – plays when the level begins
- SoundLevelFail – plays if the level is failed (all lives / hearts are lost)
- SoundLevelSucceed – plays when the level is passed
- SoundPlayer1Win – plays in versus modes when player 1 wins
- SoundPlayer2Win – plays in versus modes when player 2 wins
You can include a looping background sound using this property….
- MP3Loop – loops forever in the background. This will not affect any of the sounds above playing.
Note: Every sound except the MP3Loop is run via Sprite Kit using the playSoundFileNamed action. The MP3Loop is run through the AVFoundation framework which has some extra functionality. If you are familiar with the AVAudioPlayer’s properties, feel free to tinker with the code in the GameViewController.swift class.
Ammo/Weapon Properties…
The following properties
- UnlimitedBullets – a YES or NO value to give both players an unlimited number of bullets. By default this is NO.
- KeepExistingBulletCount – a YES or NO value to keep the existing number of bullets the players had on the previous level. If this value is less than the BulletsToStart property, it will be set to that value.
- BulletsToStart – the starting number of bullets, or in some cases absolutely minimum the players should start with.
- MaxBulletsToStart – If you set this number value, the players will at most enter the level with this many bullets. So for example, if this number was 100, but Player1 entered with 101, he would go back to 100.
- Player1Ammo – A dictionary defining properties for Player1’s extra ammo which you can include in the scene. We’ll discuss the properties within this dictionary in a separate article.
- Player2Ammo – Same as above, but for Player2.


Refresh, Respawn, and Boundary Properties…
- RefreshLevelOnDeath – a YES or NO value to refresh the current level if the player(s) don’t pass it. By default this is set to NO, which will send the player back to the home menu. If set to YES, the level is played again.
- ResetPlatformTime – a number higher than 0, will make any platforms reset back to their initial positions when the player loses a heart / life, using the number value for the duration the platform moves back. 1 would move the platform back over 1 second. This could be useful for platforms that sink down when the player stands on them (their Dynamic property is toggled on, but Affected by Gravity is off).
- BoundaryFlip – a YES or NO value to create a Pac-Man style reversal of player and enemy positions if they exceed the camera’s view. So if a player or enemy goes out of screen on the right, they will reappear on the left. By default this value is NO. This property could be set to YES on levels where the camera follows the player’s position, but it is a bit odd (since the camera would jump abruptly to the opposite side) Its recommended you exclude this property or set it to NO if the camera follows the player horizontally.
- BoundaryFlipEnemies – Identical to the BoundaryFlip property when set to YES, but this only affects enemies, and not players.
- BoundaryFlipPlayers – Identical to the BoundaryFlip property when set to YES, but this only affects players, not enemies.
- RespawnFollowsPlayerX – The kit includes two methods for respawning players after they lose a life. This property only applies to spawn points named RespawnPlayer1 and RespawnPlayer2. These are Empty SKNodes which you can position anywhere in the scene to respawn players (see the image below for reference). If this value is YES, then RespawnPlayer1 and RespawnPlayer2 will always follow the player’s x position. So for example, if these are out of scene, above the camera like in the image below, the respawn points will always be directly above where the player died. The player will be revived off screen and drop down. If this property is set to NO, the scene should delete either node named RespawnPlayer1 and RespawnPlayer2 include empty nodes named SpawnPoint (you can have multiple nodes all named SpawnPoint). The character will respawn at the closest one.

- RespawnFollowsPlayerY – Exactly like the X version of this value. If both the X and Y versions are set to YES, the respawn point will be exactly where the player died.
Resets and Stealing Hearts
- ResetScore – a YES or NO value to reset the score when the level begins. By default this is NO.
- LevelResetsHearts – a YES or NO value to reset the player’s number of Hearts / Lives when the level begins
- StealHearts – a YES or NO value to let Player 1 steal a heart by jumping on Player 2 (and vice versa). Obviously this only affects two player games. Players cannot steal the other player’s last heart / life.
- PlayerOnPlayerBounceThreshold – This is how far above the player needs to be above the other player to register a stolen heart. The code looks at the contact location between both players, and add this value to the center point of the lower player to determine if the higher player is sufficiently above the other to register a stolen heart. By default this number is 50. If this number is too low, two players might simply bump each other on a platform and register a stolen heart. If this number is too high, the stolen heart affect won’t occur. Raise or lower to your liking.
- PlayerOnPlayerImpact – a number value to affect how much force is applied (left or right) to the player that got bounced on by another player. This is applied regardless of whether or not StealHearts is set to YES or NO. By default this value is 150. Raise or lower to your liking.
Continue Properties
By default all levels are marked as a continue point. A button on the Home menu can be used to continue from the highest level passed (and using the most recent game settings). So for example, if the user was playing a single player game, continuing would restart a single player game from the highest level passed. If the most recent game was a two-player game, then a two-player game would be restarted.
- DisableContinue – A YES or NO value to mark specific level to NOT continue from. So for example on a Bonus level you probably want to set this to YES. You might also want to make your game harder by excluding levels. For example, maybe Level3 excludes this property (which by default makes it a continue point), but Level4 and Level5 set this property to YES. If the user doesn’t complete Level5, then the continue button on the home screen would send them back to Level3.
Font Properties
- ScoreFont – The common name of the font file to use for showing scores that float up from items in the game. For example, when picking up hearts or killing enemies. Use the name of the font as it appears in a program like Font Book.
![]()
If you use a custom font, you must also add the font file as an asset to the Xcode project (just drag and drop it into the project navigator into the Group called Fonts). You then need to add the font file name to the Info.plist in the Fonts provided by Application Array (which already exists). Here you need to include the exact filename of the font file.
