Each level can generate an unlimited number of enemy characters using the Enemies dictionary. Enemies can be considered anything that might damage the players. So that could be a fully animated robot or a laser beam projectile that is shot from the Robot. In terms of the kit, both would be considered “enemies”
Setup Option 1 – Use the Scene Editor
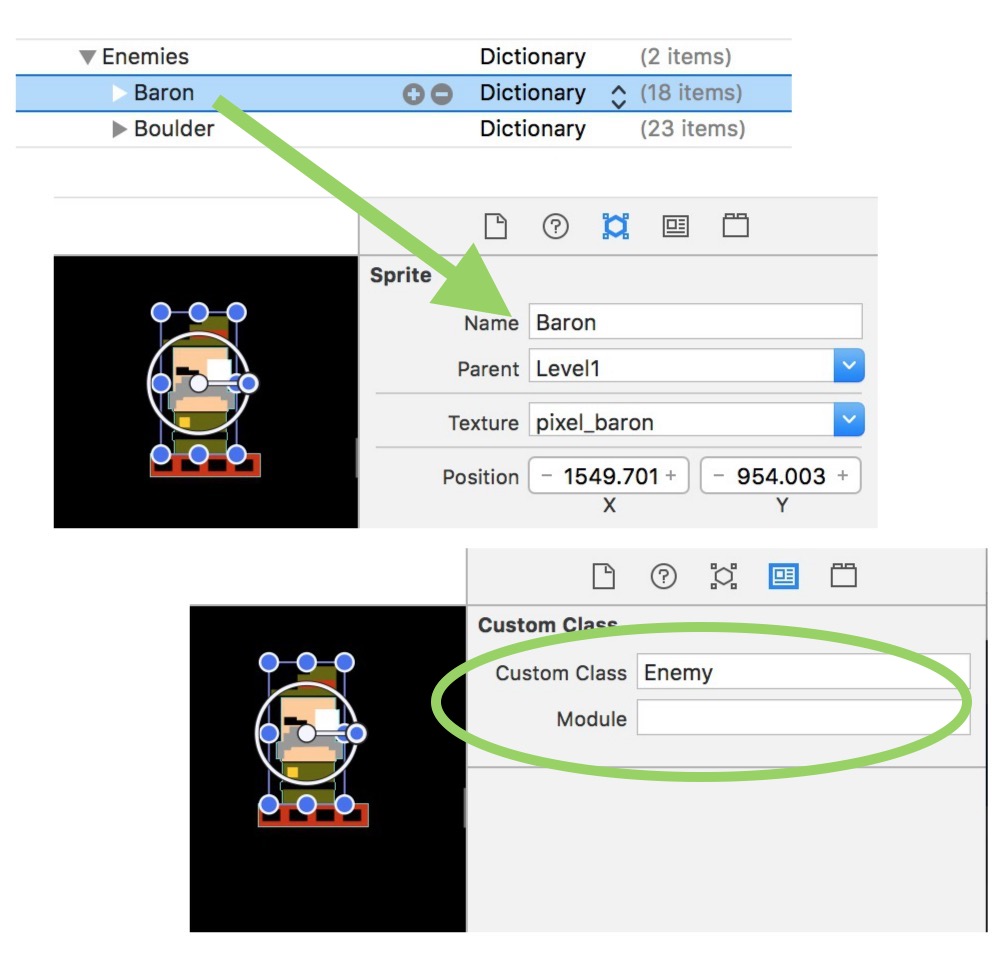
You can setup your enemy in the scene editor. Add a Color Sprite to the scene, texture it with an image you’ve imported, then set the Name (pointed to in the image below), then switch to the Custom Class tab and set the Custom Class to Enemy.
Notice in this example below, the Name “Baron” matches exactly the dictionary name in the Enemies dictionary.
If you choose this option for setting up your enemy, you can’t spawn / respawn multiple versions of the same enemy. This will only setup the single enemy defined in this spot (so ignore any of the settings that refer to spawning more enemies if you go this route).
Setup Option 2 – Spawning Enemies
Enemies can be generated at runtime in a location set by either an Empty placeholder node (seen in the image below) or using the name of another enemy. To use an Empty node, all you need to do is drag it into the scene and give it a name, for example, LeftSpawn.

Optionally, you can set the Parent property of the node to that of TheCamera (the camera in the scene). If you do this, the node will move with the camera, thus making the spawn location relative to the camera (assuming the camera follows the player). So for example, you might always spawn enemies from the top right or left of the screen. Try to keep the node within or just slightly outside of the camera’s upper view area.
In the property list, add the following property…
- SpawnNode – this will be the name of the Empty placeholder or any other node in the scene.

If you want to spawn an enemy in the same location as another enemy, like a laser from a robot or a boulder thrown from a bad guy, the SpawnNode property would be the name of another enemy. In the screenshot below, you can see that the Boulder has a SpawnNode property of Baron.

So the Baron spawns a Boulder at a set interval (using the SpawnFrequency property which you’ll see later). In this example, if the Baron had an animation setup for shooting (set using the Animation dictionary > Shoot or AngryShoot properties) this animation would automatically run. This is how you can visually tie together two enemies, so one seems like it is shooting or throwing the other at the player.
You can offset where the Boulder appears in relation to the Baron with the following property…
- SpawnOffset – a value in {x, y} format to offset where an enemy is spawned in relation to it’s location. For example, a value of { 50, 0} would move the Boulder 50 points on the x axis (to the right of the Baron), and 0 on the y axis.
![]()
If the Enemy is reversed (flipped on the x axis), the spawn offset will reverse the x value as well.
What would happen if?…
Some of you might be wondering what happens if, for example, the scene had two Baron enemies but one Boulder enemy in the property list set to spawn every so often. Exactly what you’d expect. Both Baron enemies would spawn Boulder enemies at the same time.
If you remember the old Mario Bros levels with canons that all fired at the same time, you would get that affect. If you wanted different timings for each, you would have separate property list entries for CanonBall1 and CanonBall2 which would spawn from Canon1 and Canon2.

Initial Properties…
- BaseFrame – the name of the image to use for the enemy. Even if your enemy will be animated using the animation properties (described below), set this value to the first frame of the walk animation. This will be used code-wise for sizing the enemy.
- InitialDelay – a value in seconds to wait before spawning the enemy. When a scene loads every enemy’s initial delay is started, but enemies are not spawned if they are too far offscreen. So this property might not have an affect if your spawn location is outside of the horizontal frame of the camera. If this were the case, the enemy would be spawned according to the next property.
- SpawnFrequency – a value in seconds for how often the enemy spawn after the initial delay. For example, a value of 5 would spawn the enemy every 5 seconds, as long as the spawn location is within the frame of the camera.
- TotalToSpawn – a value for the number of enemies to spawn. If this is set to 0, an infinite number will be spawned.
- XScale – a value of -1 will make the enemy character face left initially. Artwork for both players and enemies should always be drawn facing the right. A value of 1 will make the enemy face right, but this is the default anyway, so the property can be excluded if the enemy faces right initially.
- Speed – the speed the enemy moves. Enter 0 if the enemy should go nowhere (or just exclude this property).
- Score – a number value for how much score this enemy awards when it is killed.
- ShowScore – a Bool value, if set to YES the score will float upward from the enemy after it is killed (the font to use can be set in the general Settings dictionary)
- Depth – a positive or negative number value for the z position (visual depth of the enemy)
- Name – the name of the enemy. This property is only required if the enemy will be used to spawn other enemies (as described above). For example, a Laser might shoot from all Robots every few seconds. In which case the Robot would need it’s Name property would need an identifier like Robot. This property is ignore if your enemy wasn’t spawned to begin with.
- OrientToPlayer – if set to YES, the enemy will always face the player horizontally. For example if the enemy is in the middle of the scene, and the player is on the left of the screen, the enemy would flip on the x axis to face the player. If set to YES, the Enemy will ignore any EnemyBumper class items in the scene.
Physics
- BodyType – this property can have 3 possible values: Alpha, Circle or Rectangle. Alpha will use the alpha data in the base image of the enemy to create a very exact physics body. Circle will create a circular physics body, and Rectangle will create a rectangular body. Only applies to spawned enemies (for enemies setup in the Scene Editor this property is already set in the scene).
- RadiusDivider – If you choose Circle for BodyType, you can adjust how large or small the circular body is by adjusting this value. By default it is 2, which creates a circle which fits inside the base image exactly. A value of 3 would make the body smaller, and a lower number would increase the size. Only applies to spawned enemies.
- BodySize – If you choose Rectangle for BodyType, you can adjust the size of that rectangular shape to any size you wish by entering a value in {width, height} format. For example, {150, 250} would create a physics body 150 points wide, and 250 tall. Only applies to spawned enemies.
- BodyOffset – The placement of either a Circle or Rectangle body can be offset from the base image by entering a value for this property in {x, y} format. For example, a value of {0, -10} wouldn’t move the body on the x axis (rarely would ever need to) but it would move the body lower 10 points on the y axis. Don’t forget you can preview your game with all physics bodies showing by finding the GameViewController.swift file and searching for “showsPhysics” and setting that to true. Only applies to spawned enemies.
- AffectedByGravity – a YES or NO value to toggle on or off gravity pulling down the enemy. By default, this value is YES. Only applies to spawned enemies. (for enemies setup in the Scene Editor this property is already set in the scene).
- AllowsRotation – a YES or NO value to toggle on or off whether the enemy can rotate based on physics interactions. By default, this value is NO. Most likely, you want this to be NO so the enemy always stays upright. But in cases, where for example, the enemy is a boulder rolling down a hill, you would want this set to YES. Only applies to spawned enemies. (for enemies setup in the Scene Editor this property is already set in the scene).
- ImpulseVector – an initial force applied to the enemy. This is a string value defined in {x, y} format. For example, a value of { 50, 0 } would push the enemy with a horizontal force of 50 (to the right) but with 0 force vertically. If another enemy spawns an enemy that has an impulse vector, and that enemy is flipped horizontally, the impulse vector is reversed on the x axis. That way the enemy that spawns this enemy doesn’t throw it back on itself.
- CollidesWithOtherEnemies – a YES or NO Bool value to specify if the enemy can physically collide with other enemies. If YES, this enemy can’t occupy the same space as another enemy. By default this value is NO.
- Friction – a 0 to 1 Number value you can set to adjust the enemies friction. At 1 the enemy slides less, at 0 the enemy slides on other objects more.
Health / Dying / Removing the Enemy
- Health (or ReviveCount also works ) – a number value for the health of the enemy or the amount of damage an enemy can take. For example, a value of 0 would destroy the enemy right away. With value of 10, the enemy would need to be hit 10 times to be destroyed.
- ReviveTime – a number value for how long the enemy takes to “come back” from being damaged. After being damaged, the enemy can’t be hurt again and can’t hurt the player until this time has passed. It could be a small decimal value or many seconds long. You could also think of this as the amount of time the enemy is immune for after being hit.
- HealthMeter – an optional Array of image names to indicate the enemy’s health. This could be an visual representation, it doesn’t necessarily have to be a “meter”. You can see in the example below, the enemy’s health is 4, and the HealthMeter array contains 4 images. After the first hit on the enemy, the image asset named HealthMeter4 would appear. And so on.

- HealthOffset – a String value in {x, y} format to adjust where the health meter image appears in relation to the enemy’s center. So {0,35} would move up the image vertically by 35 points, but not shift it on the x axis.
- HealthFadesAfter – an optional Number value for how long the health meter stays visible for. If 2 is entered, the meter image would fade after 2 seconds. Exclude this option, if you don’t want the meter to fade away.
- SpeedAfterRevive – an optional speed value to switch to after the enemy has come back from being hurt. In terms of the kit, the enemy is in “angry” mode after being hit once (you can also have animations for angry-walking, shooting and attacking).
- RemoveOutsideBoundary – a YES or NO value to set whether the enemy should be removed if they move outside the view of the camera.
- BlinkToDeath – a YES or NO value for whether or not the enemy “blinks” away when dying. If YES, before the enemy is removed from the scene, they will flash quickly between visible and invisible states, emphasizing they are dead.
- JumpOnToKill – a YES or NO value for whether or not the players can jump on the enemy to hurt / kill it.
- JumpOnBounceBack – a number value for how much of a bounce back effect the player gets when jumping on the enemy. The default is 500.
- TreatLikeBullet – a YES or NO value to treat the enemy like a bullet or projectile. If YES, the enemy will be destroyed when it hits a platform.
- ExplodeAsBullet – a YES or NO use the Dead animation as an “explosion” type effect if the TreatLikeBullet property is set to YES.
- JumpThreshold – This is how far above the player needs to be over the enemy to jump on them to do damage. If this number is too low, a player and enemy might simply bump each other on a platform and the enemy is hurt. If this number is too high, the enemy won’t get hurt at all when the player jumps on them. By default this number is 50, which generally seems about right, but the number might need to fluctuate some depending on specific physics bodies. Raise or lower as needed.
- ExcludeFromKillCount – a YES value will exclude this enemy from being tallied in the overall enemy kill count for the level
- RemoveActionsWhenHurt – by default enemies temporarily remove their running actions when hurt. To keep those actions running, set this bool value to NO.
- CollideWithPlayerWhenHurt – a Bool value, when set to YES, the player and enemy’s physics bodies still contact each other when the enemy is hurt (by default, the player could walk through the enemy when hurt)
- HurtImpact – a value in {x, y} format to apply an impulse to the enemy when hurt
- KickWhenDownImpact – a value in {x, y} format to apply an impulse to the enemy when already hurt and re-contact occurs. Must be used when CollideWithPlayerWhenHurt is set to YES. This property is akin to when Mario is able to kick overturned Turtles.
Animation
Each enemy can have saved actions for their animations. The Animation dictionary within each enemy dictionary will specify the action for each animation (all of which are optional). Keep in mind too, saved actions can be a texture animation or any other kind of action (Move, Fade, Scale, Rotate, etc)
Below is an example of the Animation dictionary of an example enemy…

- Walk – In terms of the kit, this could also be considered the enemy’s main animation. So for example, if the character was a bat, well obviously bats don’t walk, they fly, but their flying animation would be considered their “walk”. If the enemy doesn’t walk at all, and you just want to include frames of the enemy idling, include them here as well.
- AngryWalk – an optional animation state that would run after the enemy has been damaged once. For example, you might just speed up the same walking sequence.
- Attack – this action runs when contact between an enemy and player occurs.
- AngryAttack – run when contact between an enemy and player occurs and the enemy has already been damaged once, these animation frames will run automatically if included. If not, the enemy would fall back to their regular attacking animation (if that was included)
- Shoot – In terms of the kit, a shooting animation is anything that occurs when the enemy spawns another enemy. Keep in mind, another “enemy” might by any projectile. So for example, a Rock Monster might throw another rock. A Warlock enemy might cast a spell and project out an orb. So “shooting” is just a loose term.
- AngryShoot – same as above, but run if they enemy has been damaged once.
- Hurt – run when the enemy is hurt, but will revive again.
- Dead – run when the enemy is completely dead and about to be removed from the scene.
Attacking
If the enemy and player contact each other, the enemy will automatically cause 1 point of damage against the player. If the enemy has an Attack or AngryAttack animation, these animations will automatically run when that contact occurs (assuming the player hasn’t attacked first). You can also make the enemy do timed attacks using the properties below. These are separate from the Shoot and AngryShoot animations which run when the enemy spawns another enemy (like when a Robot enemy spawns a Laser) The timing on those is determined by the enemy that is spawned.
- AttackEvery – a Number value for the amount of seconds between attacking. For example, a value of 3 would make the enemy run their Attack animation every 3 seconds. When attacking the enemy can not be damaged, and any contact between the player and enemy would result in the enemy hurting the player.
- AngryAttackEvery – a Number value for the amount of seconds between angry-attacking. The enemy must have been damaged at least once for them to be in angry attack mode. For example, a value of 3 would make the enemy run their AngryAttack animation every 3 seconds. When attacking the enemy can not be damaged, and any contact between the player and enemy would result in the enemy hurting the player.
- StopToAttack – a Bool value, if YES the enemy will stop walking forward to attack.
- StopToAngryAttack – a Bool value, if YES the enemy will stop walking forward to angry attack.
- StopToShoot – a Bool value, if YES the enemy will stop walking forward to shoot.
- StopToAngryShoot – a Bool value, if YES the enemy will stop walking forward to angry-shoot.
- KillPlayerOnContact – a Bool value, if YES the enemy will take away all the player’s health and immediately kill them when contact is made.
- Damage – the amount of health the enemy would reduce from the player if they contact each other.
Sounds
- SoundEnemyEnter – a sound file to player when the enemy is spawned. Include the file extension, such as .caf or .mp3.
- SoundEnemyHurt– a sound file to player when the enemy is hurt. Include the file extension, such as .caf or .mp3.
- SoundEnemyDie – a sound file to player when the enemy is dead. Include the file extension, such as .caf or .mp3.
- SoundEnemyAttack – a sound file to player when the enemy is attack. Include the file extension, such as .caf or .mp3.