Objects described in the Items dictionary are basically anything that doesn’t harm the player, but has some interaction with the player (aside from just being a physical obstacle). If you just want to add a simple tree to the scene, that does nothing on contact with the player, you don’t need to add information in the property list about that tree.
Here’s a look at all the sub-dictionaries we’ll talk about this article….
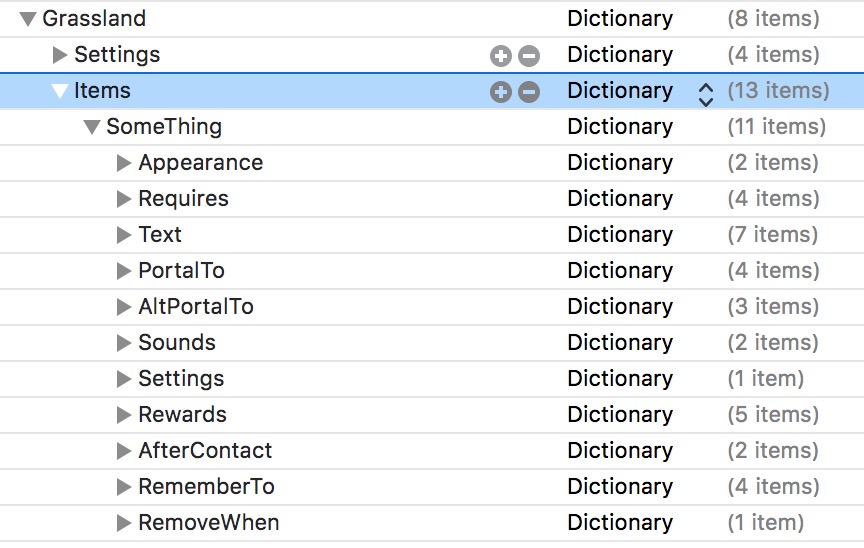
And of course we’ll discuss all the properties within those dictionaries.
Setting Up an Item in the Scene Editor
First up, we need to actually add your item to the SKS file (the scene). You can start by adding some new images to the Assets.xcassets catalog. Pro tip, if you name your images with @2x.png and @3x.png, you can drag and drop them from your Finder, straight into the catalog, and Xcode will put the images into their appropriate 2x and 3x slots. 
Next go to your scene and add a new Color Sprite (SKSpriteNode).
![]()
Drag it in from Object Library to anywhere in the scene. It will come in as a plain red square. So next step we need to texture it with the images we imported.
![]()
Type in the name of the image set from the Asset catalog. Xcode will automatically find the texture once you begin typing the first few letters.
![]()
Next up name the Sprite. This name should match exactly the dictionary name in the Items dictionary in the property list (see the image below for reference).

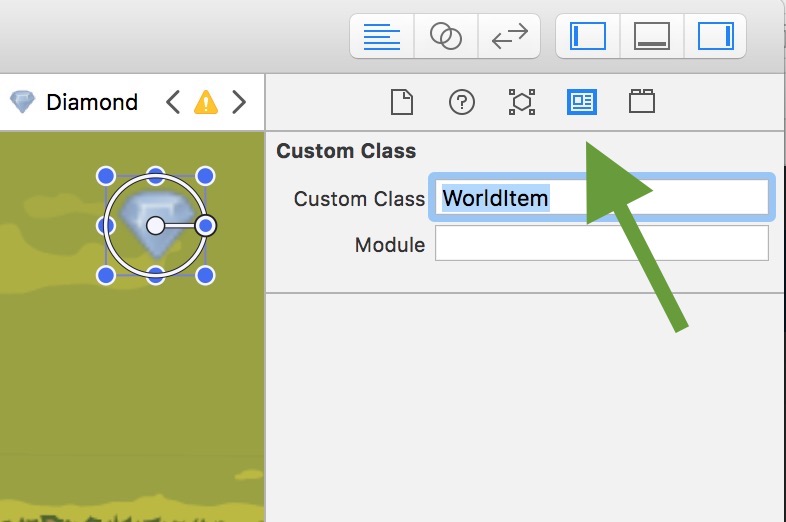
Next, you must set a Custom Class of WorldItem. Switch to the Custom Class tab (where the arrow is pointing below), and write WorldItem. You can leave Module blank.
Finally we need to add a physics body. Switch back to the Attributes tab, and scroll down to Physics Body….
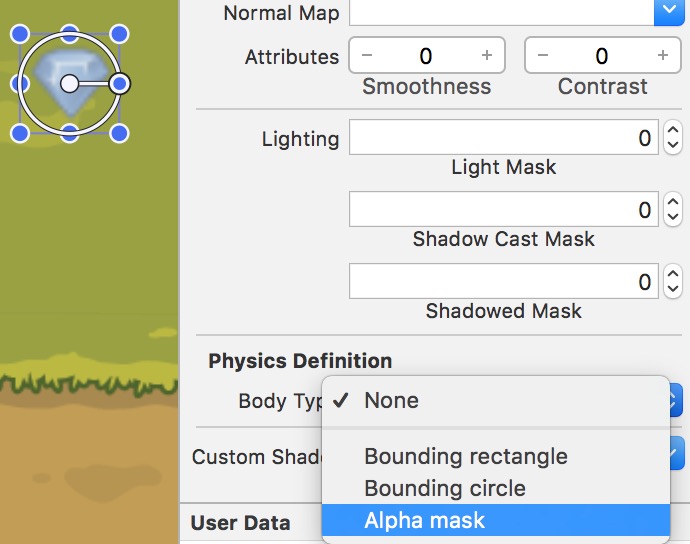
For most items you’ll want to uncheck Dynamic, Affected by Gravity, Allows Rotation.

This can vary by item, but in a top-down world, you probably don’t want the item to be affected by gravity. And again, for top down art, allowing it to be rotated can look funny. Turning on Dynamic would mean the player could push the object around, which could be useful, but for something like Diamond that the player would presumably “pick up” (and it disappear), turning Dynamic on isn’t necessary.
That’s it. Next let’s move onto discussing properties you can set for the item.
Appearance Properties
The Appearance dictionary can have the following properties…
- OpenImage – this value would be the name of the image in the asset catalog the item switches to when it makes contact with the player ( “opened” essentially)
- Animation – this value is the name of a saved action in the Actions.sks file (or different SKS file) that will run initially on the item. Saved actions can be a texture animation (or other transformation). Saved actions can loop forever or just a set number of times.
- OpenAnimation – Like the Animation property, but this action will run when the item is contacted by the player (or “opened”)


Requires Properties
The Requires dictionary is used to make “opening” an item require something. Without the requirement, the item will not open (which for example, could prevent the player from being rewarded or using the item as a portal). Notice TheCastle item in the Grassland demo has the following requirements…
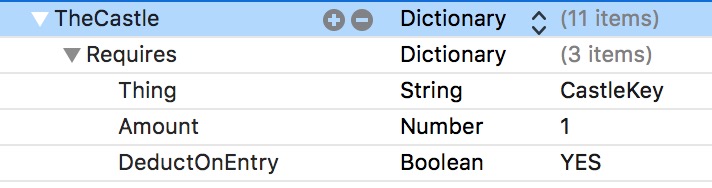
- Thing (writing Inventory also works too) – this is any value you want as the requirement. The kit is very flexible in that you can come up with your own inventory names.
- Amount – the number of things you’re requiring. In the example above, the player would only need to collect 1 CastleKey to open the TheCastle.
- DeductOnEntry (writing Deduct also works too) – a YES or NO value which specifies whether the required thing is deducted when the player successfully opens the item.
- TimeToOpen – a number value which specifies how long the player must contact the item to open it. If the player breaks contact, they have to start over.
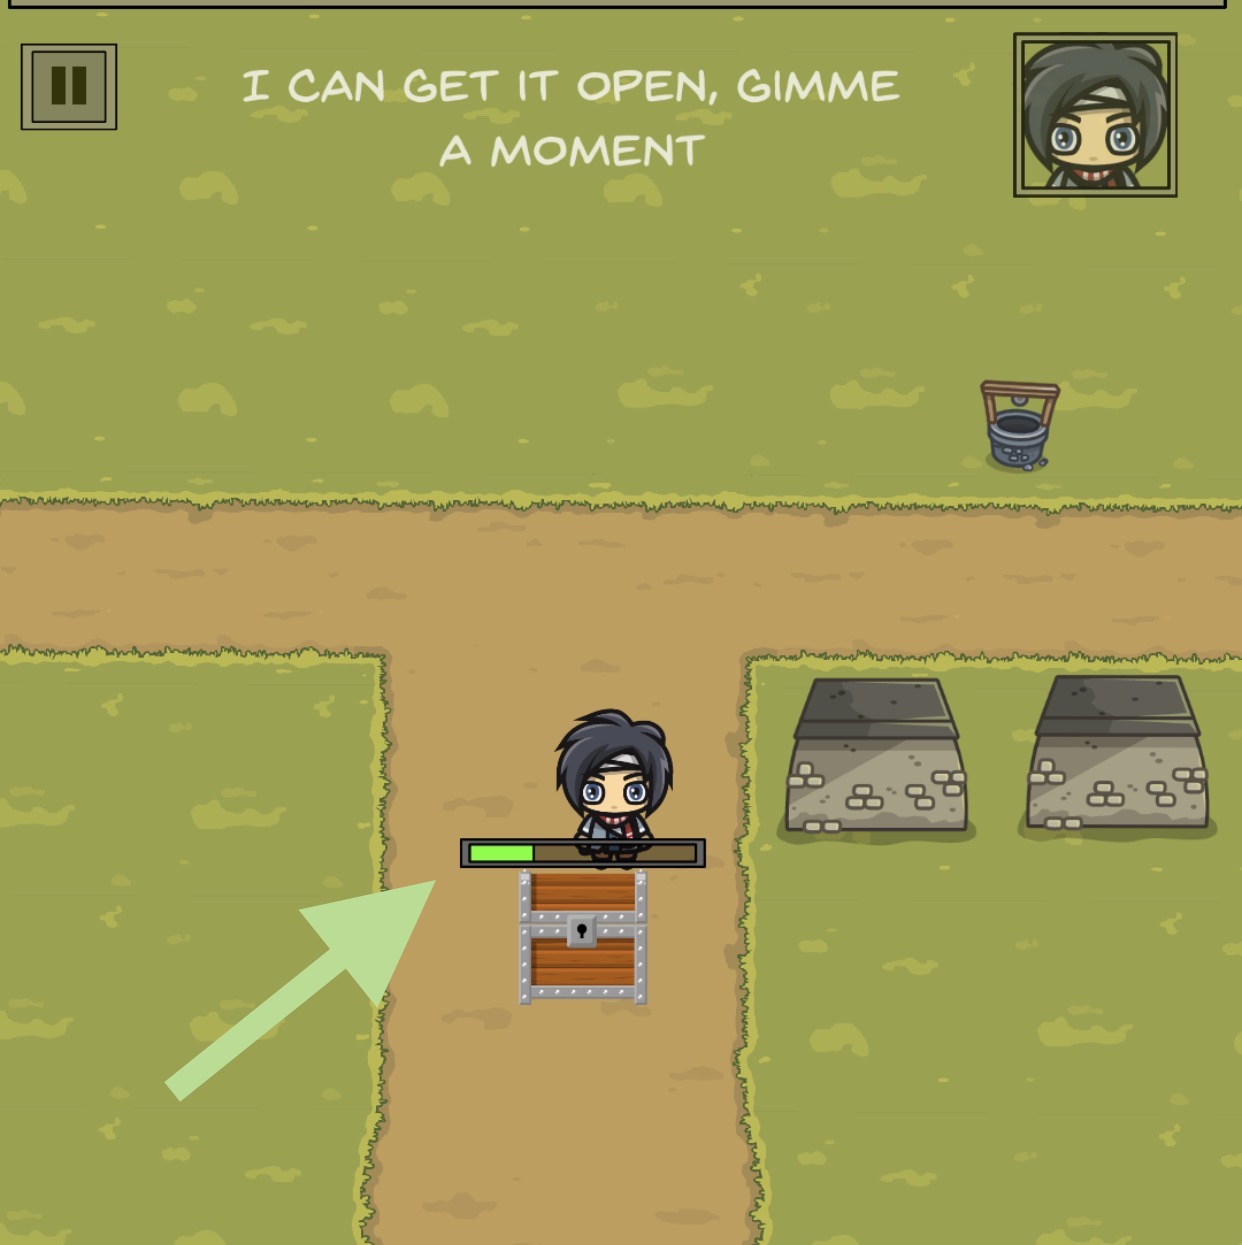
- TimerName – this is the saved action (of the animation sequence) that will appear over top the item to indicate they are opening it. For example the kit includes one named OpenTimer in the Actions.sks file. Even though the saved action only has a duration of 1 second, the kit’s code will adjust this animation to the amount you enter in TimeToOpen.

You can see the OpenTimer animation below (where the arrow is pointing)….
Text Properties
The Text dictionary allows you to add an icon and random text in your GUI to display when the character contacts the item in either it’s locked state or open state. Locked means the item requires something before it can be opened. Let’s take a look at the TheCastle example again…
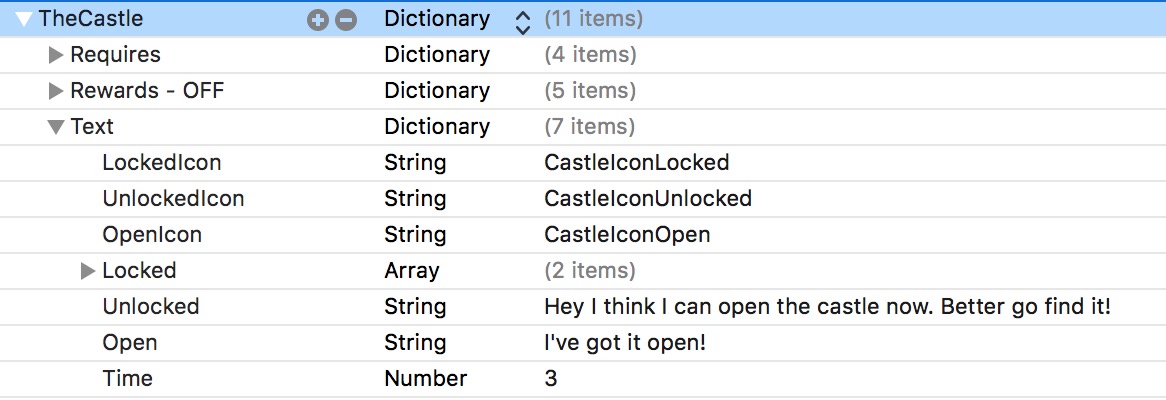
- LockedIcon – this is the name of the image in the asset catalog to show when the item is locked. This image will be shown where the SpeechIcon is in the GUI.sks file. For reference you can see where that is now…

- UnlockedIcon – this is the name of the image in the asset catalog to show when the item is unlocked. Note this will appear as soon as the requirements for a particular item are met, even if the player isn’t in contact with the item.
- OpenIcon – this is the name of the image in the asset catalog to show when the item is open, so in other words, when the player is actually in contact with the item (and has met any requirements to open the item).
- Locked – an Array or single String value for text you want to appear when the player contacts the item without meeting the requirements to open it. This text appears in the InfoLabel1 and InfoLabel2 labels in the GUI.sks file (seen above next to the speech icon). If the text is too long for one label, it will carry over to the second. An Array would randomize the text you want to use. In the example image below, one of the two lines of text would show.

- Unlocked – just like the Locked property, this can be an Array or String value. Note this will appear as soon as the requirements for a particular item are met, even if the player isn’t in contact with the item.
- Open – Just like the Locked / Unlocked properties this can be an Array or String value. This text appears when the player is actually in contact with the item (and has met any requirements to open the item).
- Time – How long the Speech Icon and Info Labels are seen for.
PortalTo Properties
The PortalTo dictionary turns the item into a portal to somewhere else. This can jump the player around the current level, to a specific spot, or to another level and a specific spot within that level. They can also be used to send the player to a non-game scene, for example, back to the opening menu, a map of the game, or a “cut scene” showing video, etc. Obviously, you can’t have a portal go to another level and open a different scene, so you’ll notice in the screenshot below Scene is switched to Scene – OFF

PortalTo can have the following properties…
- Level – the name of the level to load. This should match exactly a name in the Levels dictionary.
- Where – this is the name of a “dummy” node ( usually an invisible placeholder Sprite) in the level for the player to enter the scene at. Both the Grassland and Dungeon demo levels have an invisible node named EntryPoint. Invisible, just means the Alpha on the sprite has been turned all the way to zero.
- Delay – a number value to delay sending the player through the portal. So if you wanted your user to read some text or see an animation prior to going through the portal, you would set this to a number higher than 0.
- Scene – The name of a non-game scene to load. This name should match exactly to a dictionary name in the Root of the playlist which also matches the name of an SKS file. For example, Home and Home.sks. Or CutScene and CutScene.sks. Keep in mind, non-game scenes can automatically load the game at a particular level, so you could show the user a video on a non-game scene, then immediately send them back into the game.
AltPortalTo Properties
This dictionary can be used to send the player to an alternate level or spot if they haven’t met the requirements for an item. Basically its a trick portal, like a trap door maybe. The property names function the same as PortalTo…
- Level – the level name (which could be the current level name)
- Where – a node name
- Delay – a Number value for the time to delay.
Sounds
The Sounds dictionary has the following properties…
- Contact – this will be full name of a sound file (including the file extension) to play when the player successfully opens the item or simply contacts it if there are no requirements
- LockedContact – this will be full name of a sound file (including the file extension) to play when the player contacts the item without the requirements to open it.
Rewards Properties
The Rewards dictionary is used to give the player something when they contact the item or successfully open it. You can set an unlimited number of rewards, including “things” of your own choosing. Let’s first look at a simple example…

Notice the CastleKey item has a Rewards dictionary with the property key of CastleKey and a Number value of 1. So by contacting the CastleKey the player will also be storing one CastleKey in their inventory (later you’ll see how to make the item disappear on contact). Note that in this particular case the item and reward name match (both are CastleKey), but that’s not required. Any item can reward anything.
Although you can name your rewards anything you like, the kit has some reward names that will be recognized automatically (and trigger certain things in the code). They are…
- Health – this reward adds health to the player. Set a number value for the amount of health to add.
- Armor – this reward adds more to the player’s armor. Set a number value for the amount of armor to add.
- Projectile – the reward will be the name of an item in the Projectiles dictionary (in the Root). The player will switch to using this weapon. Players can switch weapons by tapping the weapon icon in the GUI. So for example, the Grassland demo level includes an item named AxePickup, and the Rewards dictionary has Projectile for the key name, and Axe for the value.

- Ammo – this will add ammo to the current player’s projectile weapon. The value should be a Number
- XP – this will add to the player’s XP (experience points). The value should be a Number.
- Currency – This will add to the player’s in-game money. The value should be a Number.
- Class – This reward will change the player’s class, which can essentially change everything about the player (their stats, appearance, etc). The value should match exactly the name of a dictionary in the Class dictionary in the Root. The demo of the kit includes a Peasant class.
- Sound – This will play a sound, enter the exact name of the sound file here (including the file extension)
- Level – a String value for the level to load, for example Dungeon. The player will immediately be taken to this level as a reward
- Where – a String value for where in the level the player will go to (if the previous property is used). For example, EntryPoint
- Scene – a String value for any scene (not level) you want the player to immediately be taken to as a reward. For example, MainMenu. Keep in mind, you can create an unlimited number of extra scenes, which could include video, fullscreen art, comic book panels, whatever.
Settings
You can set the following properties in the Settings dictionary….
- NonCollidable – if this Bool property is set to YES the player will not collide with it.
- Parallax – the value for this property will be a number to make the item move in a parallax fashion relative to the player. Try smaller numbers initially for example, 1.1 or -1.1 to check the effect.
AfterContact Properties
The AfterContact dictionary will contain properties that affect what happens to the item after the player contacts it or successfully opens it. These are all Bool values, either YES or NO.
- DeleteFromLevel – if YES the item will be removed from the level.
- DeleteBody – if YES only the physics body of the item is removed. The artwork of the item will still be seen.
RememberTo Properties
The RememberTo dictionary will contain properties that make the kit “remember” things about the item, even if the player changes levels and comes back in contact with the item. These are all Bool values, either YES or NO.
- NeverRewardAgain – if YES the item will never reward the player again. This is meant for items like treasure chests that once opened, stay open, and won’t reward again
- RemainOpen – if YES the item will visually stay open forever. This is meant for items like treasure chests that once opened, stay open, and won’t reward again.
- RemoveText – if YES this will remove all the Text properties. Also useful for items that once opened, stay open.
- NeverShowAgain – if YES the item will never be seen again. Even if the player changes levels and comes back in contact with the item.
RemoveWhen Properties
The RememberWhen dictionary is used to conditionally remove an item from the scene. So for example, if the player enters a level and already has the CastleKey in inventory, there’s no need to show an item that rewards another CastleKey. So this would remove the item immediately.
