The Enemies dictionary is for, can you guess…. anything that damages the player! You can make some pretty fancy enemies, ones that do both melee and ranged (projectile thrown) attacks, or you can make really simple enemies. For example, let’s take a look at some simple Spikes in the Grassland demo…

That’s all the properties it takes to make a simple, do-nothing, go-nowhere enemy. We have a Damage amount, and by setting ImmunityWhenIdle to YES, the Spikes can’t be damaged back.
On the flip side, you can make an enemy with all the properties you see below…
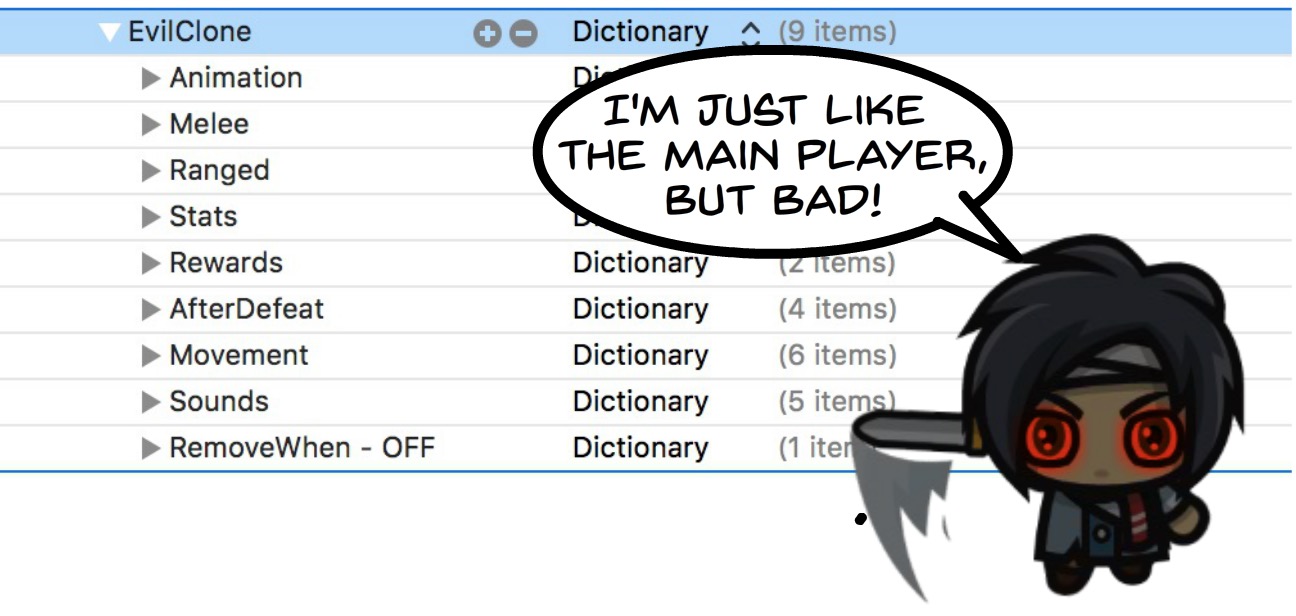
Some you might recognize from the Item section, and others will look familiar if you’ve gone through the Class section of the documentation. Enemies share a lot in common with the main player and items.
Before we dive into all the possible properties, let’s look at how to setup an Enemy….
Setting up an Enemy
Like we did in the previous article on Items, you’ll want to import in some artwork. Drop in your @2x and @3x art to the asset catalog….

Add a new Color Sprite to the scene, texture it with the image you imported to the asset catalog and set the Name property. Remember this name value must match the name of the item in the Enemies property list.

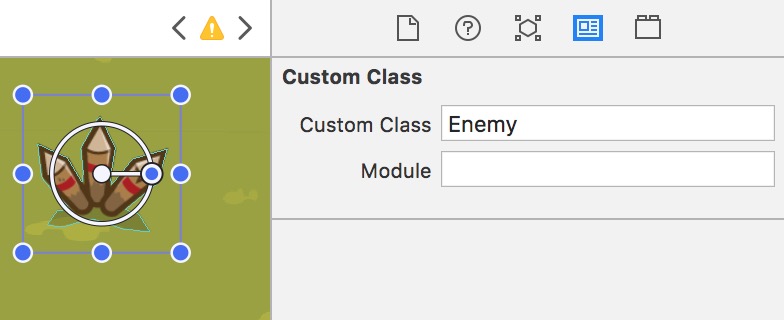
Now give it a Custom Class value of Enemy…
Finally set the Physics Definition. Most likely you want this to be Alpha so the boundary matches that of the art.
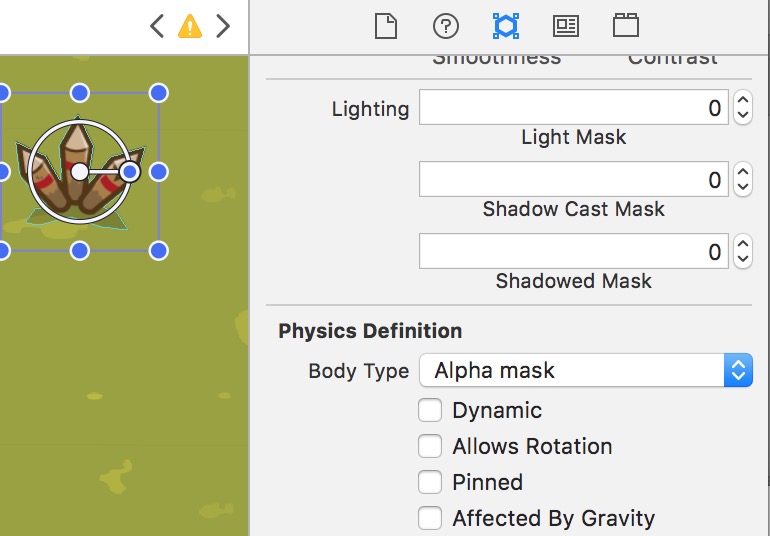
Like the Items discussed on the previous page, most likely you’ll want the sub-options Dynamic, Allows Rotation and Affected by Gravity turned off.
That’s it. Your enemy is ready for some properties.
The Animation Dictionary
This dictionary has 4 sub-dictionaries, one for each direction: Back, Front, Left, Right. All four can contain optional properties for Walk, Melee, Ranged, Hurt, Idle, and Dying. Each of these values is the name of a saved action in the Actions.sks file (or another .sks) which displays the animated sequences. To learn how to save actions, visit this link.

Each of these properties is optional. Delete any of them (or rename them) if your enemy doesn’t have these animations.
- Walk – runs when the character is walking (if Movement > WalkRandomly is set to YES or Movement > FollowPlayer is set to YES)
- Melee – runs when the enemy is doing an up-close attack
- Ranged – runs when the enemy is throwing a projectile
- Hurt – runs when the enemy is hurt
- Idle – runs when the enemy is not moving or doing anything else
- Dying – runs when the enemy is dead.
Melee Properties
The Melee dictionary is used to define the enemy’s close range attacks. These are optional properties to include if you want the enemy to attack the player within a certain range.
What the kit does is add a new sprite to the scene, below the enemy that can either grow or contract in size for a short amount of time, and if the player contacts this new sprite, they get damaged. Visually this new sprite could be invisible, or you can set the Animation property to that of a saved action (which shows a sequence of animated frames). This is mostly intended to be a quick visual effect, blast, or explosion. For reference see the image below….

The combined effect with the enemy’s main texture animation (as defined in Animation > Melee) could look something like this…

Pro Tip – If you ever want to see the physics boundaries of everything in the game, you can go into the GameViewController code and switch this line from false to true….

This is useful for seeing exactly how big sprites are that are created at runtime (since they aren’t visually laid out in the scene)
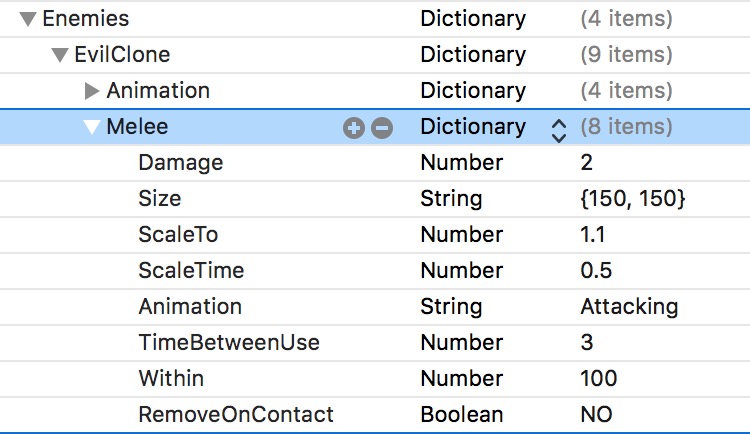
Now that you understand how the Melee attack is setup, lets look at the properties you can set…
- Damage – A number value for how much damage this will cause the player.
- Animation – the name of saved action in the Actions.sks file (or another sks file) for the animation sequence to show in the melee sprite.
- Size – this a String value in { width, height } format, for example, { 150, 150 } to set an initial size for the melee sprite.
- ScaleTo – this a Number value, most likely a decimal to determine how much the melee sprite grows or shrinks. Setting it to 1.1 would slightly increase the size, whereas setting it to 0.9 would shrink it some after it’s been added to the scene.
- ScaleTime – a Number value for how long the melee sprite is expanding or shrinking, though essentially this is also how long the sprite exists. After this amount of time, the sprite is removed. Most likely you want this to be a short amount, half a second would be 0.5
- TimeBetweenUse – a Number value specifying how often the enemy can do their melee attack. So if this is 3, the enemy will attack, then wait 3 seconds before attacking again.
- Within – this is a Number value specifying how close the player needs to be to the enemy to trigger their melee attack. If they are not within this range, the enemy will not attack. The kit checks a circular area around the enemy, so the number you provide is the radius of that area.
- RemoveOnContact – a Bool value, if YES the melee sprite will be removed as soon as the player is contacted by it (damaged). A NO value means the melee sprite is NOT removed, and will continue growing or shrinking. This could be used to push the player away from the enemy, and make it more difficult for the player to get in close and attack.
- OverEnemy – a YES value puts the melee sprite overtop the enemy visually. By default this is NO.
The Ranged Dictionary
The Ranged dictionary can optionally enable the enemy to throw projectiles at the player.
There are only a few properties in the Ranged dictionary because Projectiles are setup in their own dictionary in the Root of the property list. Notice where in the screenshot below…

You can read about all the Projectile properties in their own section of the documentation (right here), so for now we’ll just discuss those in the Ranged dictionary.
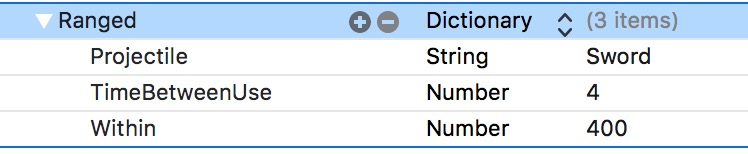
- Projectile – This is the name of the projectile defined in the Root > Projectiles of the property list. That dictionary will define everything about the object being thrown.
- TimeBetweenUse – this is a Number value for how often the enemy can throw the projectile. For example, if you enter 4, then after the enemy throws the projectile, it can’t throw again for 4 seconds.
- Within – this is a Number value defining how close the player has to be for the enemy to trigger their projectile attack. The kit checks a circular area around the enemy, so the number you provide is the radius of that area. Generally you’ll want a higher number than the Melee > Within value.
The Movement Dictionary
You have three different ways of moving the enemy in the kit. Let’s take a quick look at all three…

So let’s discuss the properties for each by example…
Example 1 – Using Saved Actions
You can see with this option you need relatively few properties, but the setup involves creating saved actions in the Actions.sks file (or any other .sks file). For a video on how to save actions go here.
The kit includes EnemyWalk and EnemyWalk2 in the Actions.sks so let’s take a quick look at those…

Notice that EnemyWalk is getting cut off, this actually an 8 second sequence, with 4 different Move actions, and each move includes 2 Animate with Textures actions (which visually show the character walking Left, Right, Backward and Forward). You could add even more actions (fades, scaling, rotations, etc). So this method gives you a lot of fine tuned control over where the enemy goes.
Note that because your Animate with Textures sequences are set here, you do not need to define them in the Animation dictionary.
So going back to the properties, the Actions array in the Movement dictionary defines the order you want the actions to run. So in this case, EnemyWalk would occur first, then EnemyWalk2. You can include as many actions in this array as you want.
The Within property is the radius around the enemy, that will trigger them moving. So if the player is within that radius the enemy will begin doing these actions.
Example 2 – The Enemy Follows the Player
This is a fun one, and the hardest for the player. Here are the properties…
- FollowsPlayer – a Bool value, setting this to YES makes them following the player around the scene. They will stop if they are out of range (as defined by the next property)
- Within – A number value for the radius around the enemy that will trigger them moving.
- Speed – a Number value, for how fast they move. This can be a decimal value.
Using this walk method will use the saved actions of animation sequences defined in the Animation dictionary.
Example 3 – The Enemy Moves Randomly
Great for somewhat senseless enemies. The randomness can at times make them difficult. You can set the following properties…
- Within – A number value for the radius around the enemy that will trigger them moving.
- WalkRandomly – A Bool value, setting this to YES will make the enemy walk randomly.
- WalkTime – A Number value for how long they will walk for.
- WalkDistance – A Number value for how far they will walk.
- WaitTime – A Number value for how long they will wait before choosing a new direction to move.
- RandomWaitTime – Instead of the previous property, you can set this value to a non-decimal Number and the kit will pick a random time within this range to wait.
- OnlyMoveUpDown – a Bool value, setting this to YES will limit the random movement to just up and down directions
- OnlyMoveLeftRight – a Bool value, setting this to YES will limit the random movement to just left and right directions
- EaseOut – a Bool value, setting this to YES will ease out the movement (slow it down toward the end)
- EaseIn – a Bool value, setting this to YES will ease in the movement (slow it down in the beginning)
- EaseInOut – a Bool value, setting this to YES will ease in the beginning and end of the movement
Using this walk method will use the saved actions of animation sequences defined in the Animation dictionary.
The Stats Dictionary
The Stats dictionary contains some general properties for the enemy….

- Health – a Number value for the health of the enemy. Essentially how much damaged the enemy can take. So if the player hits the enemy with a projectile that has a damage value of 1, then 1 is subtracted from the enemy’s health. At zero, the enemy is dead.
- Damage – How much damage the enemy inflicts on the player when there’s a contact between the two. Keep in mind, this damage has nothing to do with either the melee or ranged attacks. This is just a general damage inflicted from direct contact. Notice the Spikes example at the top of the page, had this setting. This value could also be zero if you only want the enemy to inflict damage from their melee and ranged attacks.
- Immunity – A number value for how long the enemy is immune after they are damaged. For this amount of time, the enemy can not be damaged.
- ImmunityWhenIdle – A Bool value, YES means the enemy can not be attacked in their idle state. The enemy is considered “idle” if they are not moving. Some enemies, like the Spikes example, will never move, so they are always idle.
- ShowHealthWhenHit – A Bool value, YES means a number will appear above the enemy when they are damaged showing their current health.
- HealthFont – the font name for the health that appears above the enemy when damaged. To watch a video on how to add custom fonts to Xcode, click here.
The Rewards Dictionary
Enemies can reward players once they’ve been defeated. The Rewards dictionary uses all the same properties as the Rewards dictionary described in the Items section.

You can include as many or as few rewards as you want. Including key names and amounts of your own choosing (to reward any kind of inventory of your choosing). Although you can name your rewards anything you like, the kit has some reward names that will be recognized automatically (and trigger certain things in the code)
- Health – this reward adds health to the player. Set a number value for the amount of health to add.
- Armor – this reward adds more to the player’s armor. Set a number value for the amount of armor to add.
- Projectile – the reward will be the name of an item in the Projectiles dictionary (in the Root). The player will switch to using this weapon.
- Ammo – this will add ammo to the current player’s projectile weapon. The value should be a Number
- XP – this will add to the player’s XP (experience points). The value should be a Number.
- Currency – This will add to the player’s in-game money. The value should be a Number.
- Class – This reward will change the player’s class, which can essentially change everything about the player (their stats, appearance, etc). The value should match exactly the name of a dictionary in the Class dictionary in the Root. The demo of the kit includes a Peasant class.
- Sound – This will play a sound, enter the exact name of the sound file here (including the file extension)
- Level – a String value for the level to load, for example Dungeon. The player will immediately be taken to this level as a reward
- Where – a String value for where in the level the player will go to (if the previous property is used). For example, EntryPoint
- Scene – a String value for any scene (not level) you want the player to immediately be taken to as a reward. For example, MainMenu. Keep in mind, you can create an unlimited number of extra scenes, which could include video, fullscreen art, comic book panels, whatever.
The AfterDefeat Dictionary
The AfterDefeat dictionary allows you to decide what to do with the enemy after they’ve been defeated. You can include the following properties…
- NeverRewardAgain – a Bool value, setting this to YES will mean the enemy can never reward the player again. If you do this, keep in mind your enemy should have a unique name, for example, Turtle1, instead of just Turtle. Otherwise if you had multiple enemies all named Turtle, then none of them would reward after the first one was defeated.
- NeverShowAgain – a Bool value, setting this to YES will mean the enemy will never be seen again. Again, use unique names.
- DeleteFromLevel – a Bool value, by default this is set to YES, but if you set it to NO, the enemy will not be deleted from the level after being defeated. So in other words, the artwork of the enemy in their dying position would remain.
- DeleteBody – a Bool value, setting this to YES would delete only the physics body of the enemy. You could use this in conjunction with the previous property, to make it so the artwork of the dead enemy stays in the scene, but the player can walk through the body.
- RespawnAfter – a Number value for the amount of time to wait before re-spawning the enemy. By default enemies do not re-spawn.
- RespawnWithRewards – A Bool value, setting this to YES, means the enemy will re-spawn and reward the player again if defeated again. Good for simple rewards like XP.
The Sounds Dictionary
Each of the properties below are optional, and the value should be the full file name of the sound. Including the file extension.

- Melee – plays when the enemy does their melee attack
- Ranged – plays when the enemy does their ranged attack (throws a projectile)
- Hurt – plays when the enemy is damaged, but not dead.
- Dead – plays when the enemy is defeated.
- Respawn – plays when the enemy respawns.
The RemoveWhen Dictionary
You can use this dictionary to remove the enemy conditionally. This only runs when the player first enters the level. So maybe if the player collects enough Garlic, it would remove Vampires from another level.
