Wednesday Discount - Lifetime Access for $20!!!! - Click Here!

How to Draw All Your Own Game Art

Over 12 Hours of Video Tutorials

    Login               Join          

How to Draw All Your Own Game Art

Over 12 hours of game art tutorials, broken into 45 short movies.

You’ve got a great idea for a game. Maybe you’ve got the programming chops to code it all yourself. Now you need art. You can hire someone, but that can cost a lot of money. You can license art, but that might not give you exactly what you want. This course can give you the training you need to do some or all your app’s art production yourself.

Imagine being able to see a style of art or reference image and already knowing the steps to recreate something similar. That’s the true aim of this course. The wide range of topics in the course should make you feel confident enough to try illustrating any aspect of your game, be it the logo, hero, background or interface. We’ll even cover animation and discuss tips to exporting image sequences specifically for games.

How to Draw All Your Own Game Art

Topics Covered…

The All-Important Logo

In this section, we’ll look at some incredibly easy tips you can use with just about any font to make your logo stand out. Your logo is one of the first things people will see in the game itself, but more importantly, potential players will scrutinize any preview screenshots in the store before downloading your game. This first impression could be the key to people downloading your app or not.

Ye ol’ Quest Map

Alright matey’s, no one knows where to begin their journey without a map. This could be used as a guide to give players an overview of the various levels they will travel to. Or you could simply create a map for decoration in conjunction with your logo. Maps can be a great, soft background piece behind text, or other user interface elements.

Interface Elements and Buttons

In this session, we’ll be covering many types of interface elements, or GUI. This will include buttons, progress bars, selection icons, radar, and anything else you might find while playing the game or within a menu.

Designing Game Characters

In this session we’ll tackle drawing your main character. We’ll practice drawing the in-game views (front, back and side) and more detailed closeup views for Selection Screens, App icons or Promotional Art.

Character Animations
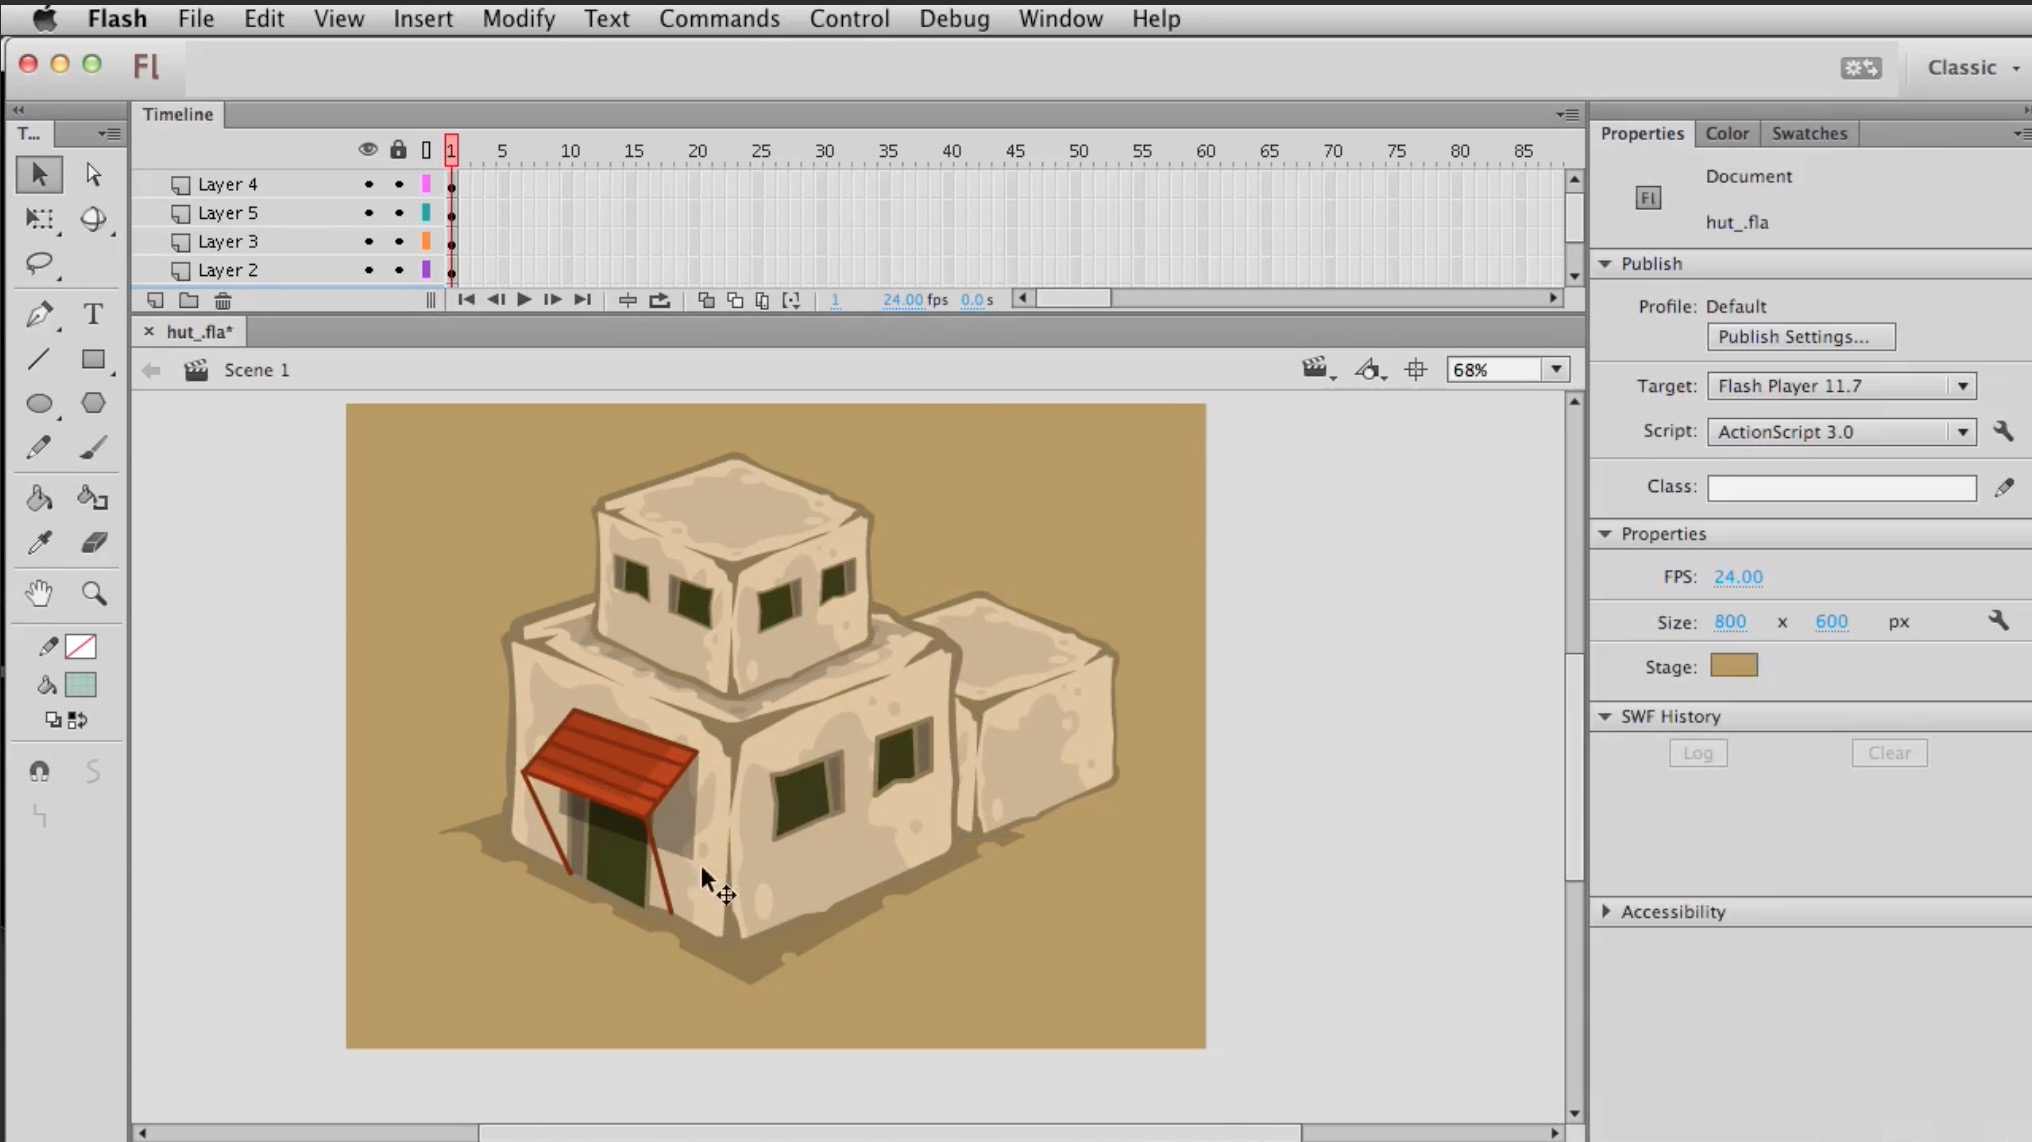
In this session you’ll learn how to animate your character from the previous session. We’ll look at front and side view walking animation, an attack animation, how to add an interesting attack effect, and how to export a PNG sequence or Sprite Sheet from Animate.

Terrain

In this session we will construct various top-down view terrains. Combined with the buildings and structures taught in the next session, you’ll have some very detailed backgrounds to work with.

How to Draw Buildings

In this session we will cover perspective points, sketching ideas for buildings and creating multiple different structures, as usual using Adobe Animate. You’ll learn how to draw a castle, tiki house, and modular style buildings which are great for filling larger background pieces with very little art.

how to draw overhead view buildings in a game

Animation FX

In this session we will look at explosion FX which you could use for collisions, impacts, death sequences, etc. We will also practice animating looping effects to use in a background sequence. Great for adding a little extra life to your game’s scenes.

How to add animation fx to your game

Session Details…

How to Draw All Your Own Game Art Session 1 Preview

Session 1 – Animate Basics

  1. Initial Setup with Animate – 18:03 – A free primer course in using Adobe Animate
  2. Manipulating Vector Points – 5:00 – A short video discussing how to move vector points around in Adobe Animate

Session 2 – The All Important Logo

  1. Basic Logo Layout (Free) – 12:15 – In this video, we will look at the basic layout of your logo. Topics include the area your logo will ideally occupy, issues you might run into if your logo exceeds a certain width, emphasizing certain words over others, and other subtleties you might not think of otherwise.
  2. Starting the Empire of Ages Logo –  18:14 – We will begin to create a fully-realized logo for a hypothetical game called “Empire of Areas”. In this video, we will get as far as adjusting the text to perfection, then adding a backing layer behind the main text to make it appear extruded.
  3. Color the Logo – 18:36 – In this video, we will color the text and add small, but noticeable details. We will explore the gradient options in Animate and discuss some benefits of using Symbols for repetitive objects or patterns.
  4. Adding the Logo Backing –  22:10 – In this video, we will create a backing for the main text of the logo. The background will include a castle-inspired shape, draped flag, and sword.
  5. Lighting the Logo –  15:03 – To complete our logo, we will light it using Blend Effects and a filtered flame symbol. We’ll also look at how well our logo holds up against different backgrounds and sizes.
How to Draw All Your Own Game Art Session 3 Preview

Session 3 – Ye ol’ Quest Map

  1. Quest Map – Starting out (Free) –  21:01 – In this tutorial, we’ll begin our quest map by creating the base, establishing a color scheme, and adding lakes.
  2. How to Draw Streams and Docks – 23:00 – In this lesson, we’ll connect our lakes with rivers, add dock icons, and overlay text on the map. Check out Blambot.com for some great free and paid fonts to use. We suggest Ale and Wenches.
  3. How to Draw Mountains and Roads – 20:07  – In this video, we’ll add mountains and roads. What quest map is complete without some kind of ill-fated mountain pass.
  4. How to Draw Forests and Cliffs –  24:28 – In this video, we’ll touch on the darker parts. The scary forest and smokey cliffs of the map.
  5. How to Draw a Village –  17:14 – To finish off our map, we’ll add a quaint little village and a North, South, East, West icon.
How to Draw All Your Own Game Art Session 4 Preview

Session 4 – General User Interface

  1. Introduction – 5:04 – The introduction to this session of tutorials talks about some “what not to do’s”, with an emphasis on young players (those who can’t read), and games that offer TOO many up-front options.
  2. Drawing a Play Button and Establishing a Theme – 23:02 – In this video, we’ll begin to create 2 possible Play buttons, and aside from creating the art from scratch, we’ll talk about establishing a theme for your game’s general user interface.
  3. Drawing a Sci-Fi Style Play Button – 20:14 – In this tutorial, we’ll convert our first Play button from a medieval theme to a Sci-Fi or military style theme.
  4. Drawing Interface Elements – Health / Progress Bar – 18:46 – In this lesson, we will make a Progress Bar which could be used to indicate the player’s health has been drained, or some type of weaponry is being used up.
  5. Adding Chains and Drawing a Compass Radar –  7:41 – In this video, we will create a glassy radar or compass (and we will add some chains to the Play button).
  6. Creating a Selected Style Icon – 17:41 – In this tutorial, we’ll look at creating a “selection” box to indicate which of multiple options is the chosen one.
  7. Drawing a Space Button – 18:36 – In this video, we will work on a smoother, Wall-E style button for a more realistic gaming interface.
  8. Overview of Finished GUI – 6:32 – In this video, we will look at some already completed elements for a Tower Defense game’s GUI.
How to Draw All Your Own Game Art Session 5 Preview

Session 5 – Designing Game Characters

  1. How to Draw a Character for a “Choose a Character” Screen – 17:15 – In this video we will start looking at character design, beginning with a front view character. The finished piece could be used in a Choose Your Character scene before the game starts.
  2. How to Draw a Character for a “Choose a Character” Screen – Continued – 24:30 – In this video, we will finish the knight character which we started in the previous video. We will draw his chest armor, cape, arms, hand and sword hilt.
  3. How to Draw an In-Game Character – Front View –  22:38 – In this video, we will draw the front view of the in-game character.
  4. How to Draw an In-Game Character – Back View – 13:50 – In this video, we will draw the back view of the in-game character.
  5. How to Draw an In-Game Character – Side View –  12:46 – In this video, we will draw the side view of the in-game character.
How to Draw All Your Own Game Art Session 6 Preview

Session 6 – Game Character Animation

  1. How to Animate a Front View Walk Cycle –  20:56 – In this tutorial, we will animate the in-game characters front view walk cycle.
  2. How to Animate a Side View Walk Cycle – 18:19 -In this tutorial, we will animate the in-game characters side view walk cycle.
  3. How to Animate an Attack Animation –  21:48 – In this video we will create an animated attack sequence.
  4. Adding FX to the Attack Animation –  21:04 – In this video, we will complete or our attack animation by adding a few more frames and overlay an icy flame effect.
  5. How to Export From Animate – 11:06 – In this tutorial, we will discuss exporting your Animate file to a spritesheet or PNG sequence to be imported to the software development kit of your choice (iOS, Android, etc) .
How to Draw All Your Own Game Art Session 7 Preview

Session 7 – Creating Terrain for a Game

  1. The Outlands – 20:37 – In this tutorial we will create an ominous looking rocky, terrain.
  2. The Outlands (continued) – 22:00 – In this video we will add to our previous terrain, with broken logs, vines, grass and a patch of vines.
  3. The Ocean –  21:37 – In this tutorial we will create our ocean scape, including islands and a luminous ocean.
  4. The Ocean (continued) – 21:04 – In this video, we will add rocks, grass, a bridge and dock.
  5. The Bad Part of Anywhere – In this video we will create an overhead view of a lava level.
  6. The Bad Part of Anywhere (continued) – We’ll finish off our not-so-friendly lava level.

Session 8 – Buildings

  1. Perspective 101 – 15:10 – In this tutorial we quickly go over some fundamentals of perspective points.
  2. How to Draw a Castle – 24:14 – In this video, we will create a simple top down view castle.
  3. How to Draw Modular Huts – 18:24 – In this tutorial we will change the view slightly to a more isometric style and work on a hut that could stacked or laid side-by-side to easily create a sprawling landscape of buildings.
  4. Sketching Ideas for Buildings – 16:59 – In this video, we use Adobe Animate as a kind of sketching tool, to brainstorm ideas for a building. We will create a cube, then try attaching a random shape correctly in perspective.
  5. The Tiki House – 24:31 – In this tutorial, we will create a jungle house. The materials of the house should give off a more organic vibe.

Session 9 – Animated FX

  1. How to animate a Star Burst Explosion – In this video, we will animate a star-burst style collision effect. This is useful for any kind of impact in a game, like getting hit with a weapon or just running into a wall.
  2. How to animate a Ring Blast Explosion – In this video, we will animate a bit more to the burst explosion by adding a smokey ring blast around the initial effect.
  3. How to animate a Smoking Loop – In this video we will animate a looping smoke effect.

How to Draw All Your Own Game Art – Over 12 Hours of Video Tutorials

Three affordable purchasing options…

Purchase Option 1 - Lifetime Access to just this course

Get Lifetime Access to this course for a one-time purchase price. You can stream the movie files and download any source projects. All proceeds from this sale will go directly toward the course author.

Purchase Option 2 - Subscription Access

Get access to this course and dozens more through the CartoonSmart Subscription. Stream videos from any of your devices and download any source files / projects.

  • Billed once per month until cancelled

  • Billed once per year, 2 times

Add to Cart

Purchase Option 3 - Lifetime Membership

Get access to everything on CartoonSmart.com for your entire life! Stream videos from any of your devices and download any source files / projects. After the sale you can show your support for this creator (or multiple creators) using our unique Creator Bonus system. Every member gets to directly encourage more of the content they want to see most!


Know what an affiliate program is? You make money just by sharing links to our site! Win. Win.

Earn when you refer any buyer here! 30 day tracking. Commissions are 33%-50% and recur on subscription products!